


The bumper is removed when removing the radiator, the intercooler and for other types of repair work.
The following tools are required: a TORX T25 key, screwdrivers, a clip remover. The GAZelle Next front bumper is plastic (ABS), secured to the plastic base of the radiator frame and to the side panels with M5 TORX T25 screws; the clips are nylon, 8 mm in diameter; the bumper reinforcement is steel, secured with M8 bolts.
We prepare the vehicle for the work.
We remove the number plate.

We undo the two screws located under the number plate.

We undo the wheel arch liner screws in the lower part of the wing.

We undo the screws securing the liner to the bumper side panel.

We undo the three screws in the lower central part.

We undo one screw on the left and one on the right securing the bumper side parts to the plastic base of the radiator frame.

We undo the two screws securing the wheel arch liner in the lower part of the bumper.

We undo the four upper bumper mounting screws.

We disengage the bumper side parts.

We bring the bumper panel out from under the headlights and remove the bumper.

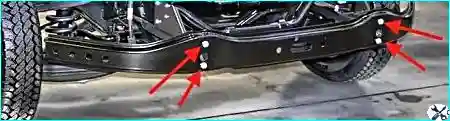
If necessary, we remove the bumper reinforcement. To do this, we undo two bolts on the left and two on the right and remove the bumper reinforcement.
Disassembling the bumper
To make disassembly easier and to avoid breaking the plastic parts of the bumper, the front bumper must be disassembled and assembled while secured in a special fixture.

To avoid breaking the fastening elements of the plastic parts, the sequence of bumper disassembly and assembly must be strictly followed.
We remove the bumper.
We undo the ten screws 1 (Figure 13) securing the radiator grille trim to the other bumper parts.

We disengage four catches 5 and two catches 4 securing the radiator grille trim to the lower panel, six catches 2 and two catches 3 securing the trim to the side panels, and remove the radiator grille trim.
We disengage two catches 4 securing the lower panel to the side panels, move the lower panel upwards relative to the side panels so that the lugs on the lower panel come out of engagement with the side panels, and separate the bumper parts.
We assemble the bumper in the reverse order. On reassembly, we replace damaged nylon clips and catches with new ones; we tighten the screws to 1.5–2.5 N·m and the reinforcement bolts to 18–22 N·m.
Removing and refitting the wheel arch liners
Tools required: screwdrivers and a clip remover. The wheel arch liners are plastic (polypropylene), secured with M5 screws and nylon expansion clips 8 mm in diameter.
We undo the wheel arch liner screws in the lower part of the wing.
We undo the screws securing the wheel arch liner to the bumper side panel.
We undo the two screws securing the wheel arch liner to the lower side part of the bumper.
We prise it up with a screwdriver.

We pull out the expansion pin of the rear wheel arch liner retainer.

We take the retainer out of the holes in the wheel arch liner and the wheel arch.

We also remove the front retainer.

We remove the wheel arch liner. We refit the wheel arch liner in the reverse order.