We remove the engine crankshaft during a major overhaul
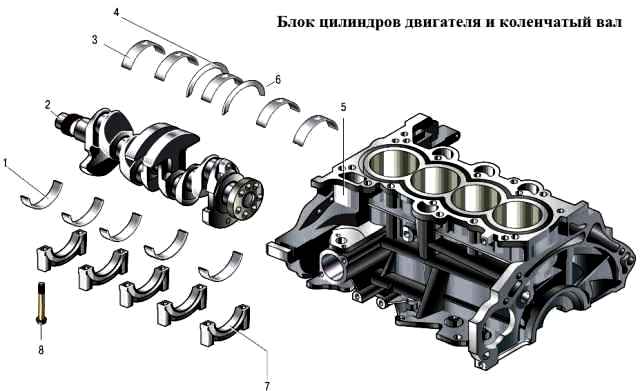
The crankshaft rotates in main bearings with thin-walled steel liners with an anti-friction layer.
It is fixed from axial movements by two half rings installed in the grooves of the bed of the middle main bearing.
Removing the crankshaft
Conventionally, the engine is installed on the stand and the connecting rod and piston group is dismantled from it
We unscrew the bolts securing the connecting rod caps and disconnect the connecting rod heads from the connecting rod journals of the crankshaft, described in the article "Repair of the connecting rod and piston group of the Hyundai Solaris engine"
Remove the flywheel
We unscrew the bolts of the crankshaft main bearing caps in the reverse order of tightening during installation

Remove the crankshaft and crankshaft thrust washers
Remove the liners from the covers and beds of the main bearings. We examine the liners.
If on the working surface of the liners there are risks, scuffs, delamination of the antifriction layer, we replace the liners with new ones.

Inspecting the crankshaft. Cracks are not allowed.
On the surfaces mating with the working edges of the seals, there should be no scratches, nicks, scratches. If they are found, we replace the shaft.
We measure the outer diameter Dn of the main journals with a micrometer.
The actual clearance between the main bearing shells and the crankshaft main journals is determined in the same way as described in the article "Hyundai Solaris Repair of the connecting rod and piston group of the Hyundai Solaris engine"
The nominal gap is 0.018-0.045 mm, the maximum allowable gap is 0.1 mm.
If the actual design gap is less than the limit, you can reuse the bearings that were installed.
If the gap is greater than the maximum allowable, we replace the liners on these journals with new ones, selecting them according to the class of the nominal diameter of the crankshaft main journals
The main journals of the crankshaft are divided into three classes according to the nominal diameter:
- - class 1 (Dн = 47.960–47.954 mm);
- - class 2 (Dн = 47.954–47.948 mm);
- - class 3 (Dн = 47.948–47.942 mm).
The end surfaces of the main bearing shells of classes 1 and 3 are marked in different colors: class 1 bearings are black, class 3 green.
Class 2 inserts are not marked.
Check the parallelism of the thrust collars of the middle main journal of the crankshaft: if they are not parallel, the shaft is bent and needs to be replaced.
We wash the channels of the crankshaft, for this we pour kerosene into the radial channels, having previously drowned them out on one side with wooden plugs.
We stand for about 30 minutes and wash the channels with gasoline.
Repeat flushing until clean gasoline flows out through the connecting channels.

We lay the upper main bearing shells in the bed of the cylinder block
Set the inserts so that the antennae of the insert is aligned with the notch in the bed

Lubricate the liners with engine oil
We put the crankshaft in the cylinder block

Install the thrust half rings of the middle crankshaft bearing
Install the front thrust half ring with grooves towards the front of the engine (towards the timing chain)
We put the lower liners in the main bearing caps, aligning the antennae of the liners with the recesses on the caps.
Lubricate the crankshaft main journals with engine oil
Lubricating the crankshaft main bearing shells
We install the main bearing caps according to the serial numbers
To install bearing caps, use a soft-faced hammer.
It is forbidden to install the covers by tightening the fasteners, since in this case the seating surfaces of the covers and the cylinder block will be damaged
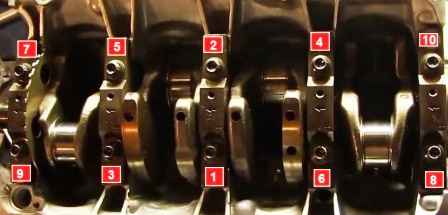
Install the cover bolts, tighten with a torque of 17.7-21.6 Nm in the order shown in the figure
We tighten the bolts of the covers at an angle of 88-92 ° in the same order.
Before installing the crankshaft bearing cap bolts, measure their length from the bottom of the head to the end.
If the bolt length is more than 75.3 mm, replace the bolt
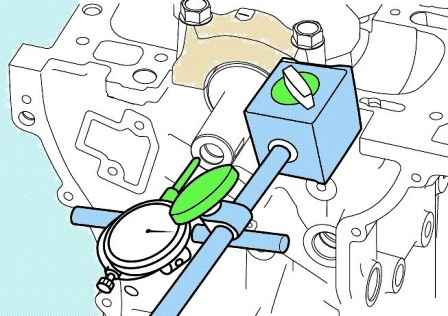
Check the axial clearance of the crankshaft, it should be 0.05-0.25 mm.
The maximum allowable gap is 0.4 mm.
If the gap is greater than the maximum allowable value, we replace the crankshaft thrust washers.
Install all parts in reverse order.

")
")
")
")