
Checking the brake mechanisms
Place the car on a lift or horizontal surface
Loosen the wheel mounting nuts
Lift the car using a lift or jack and remove the wheel from the side being checked

We check the thickness of the brake pads through a special inspection hole.
The standard value of the thickness of the linings of the front brake mechanisms is 11.0 mm, the maximum permissible is 2.0 mm
The standard value of the thickness of the linings of the rear brake mechanisms is 10.0 mm, the maximum permissible is 2.0 mm
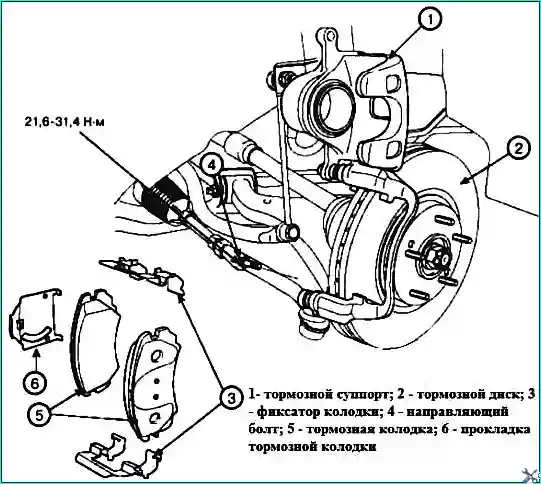
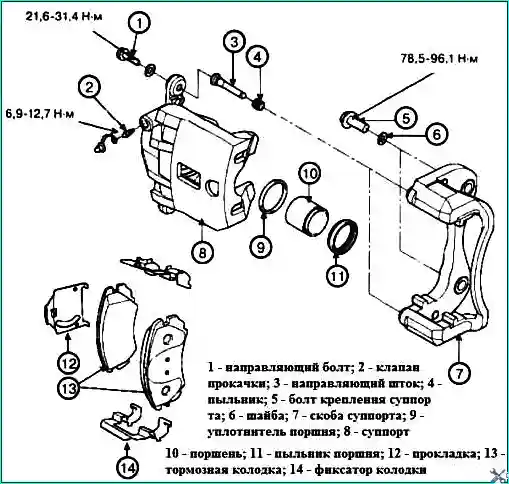
Removing the brake pads of the front wheels

Unscrew the guide bolt (B) and lift the brake caliper (A)
Check the hoses and the boot of the finger for damage and wear

Remove the pad gaskets (A), pad retainer (B) and pads (C)
Installing the front pads

We install the pad retainers (A) on the caliper

We check for foreign material on the pad gaskets (A) and the back of the pads (B)
Correctly install the brake pads (B) and pad linings (A) on the retainer
Install the brake pad with the wear indicator inside
If you reuse the pads, you need to install them in their original position to prevent loss of braking efficiency

Press on the piston (A) using the 09581-11000 device so that the caliper is above pads
Make sure the piston boot is in the correct position to prevent damage when rotating the caliper

Move the caliper down, trying not to damage the boot of the finger (A), then screw in the guide bolt (B) and tighten to the required torque
If the caliper was removed, then connect the brake hose to the caliper
Add brake fluid to the expansion tank of the master cylinder
Bleed the brake system, article - Bleeding the hydraulic sys brake systems
After replacing the brake pads with new ones, the brake pedal travel may increase. Therefore, it is necessary to press the brake pedal several times to restore the travel distance
After installing and connecting the hoses, check the brake system for brake fluid leaks
Checking the brake disc
Clean the brake disc from foreign objects
Using a micrometer, measure the thickness of the brake disc at least in eight points.

The standard thickness of the brake disc is 26.0 mm. Maximum permissible thickness is 24.4 mm
The disc thickness should not exceed 0.005 mm in circumference and 0.01 mm in radius
If the disc wear exceeds the established limits, the brake disc must be replaced on both sides
Checking the runout of the brake disc
Set the dial indicator so that its needle is 5 mm from the edge of the brake disc
Turn the disc by hand to measure the runout.

The maximum permissible runout value of the brake disc is 0.04 mm or less
If the runout of the brake disc exceeds the permissible value, the disc must be replaced
If the runout value does not exceed the permissible runout, but still occurs, then the disc must be removed and replaced, and then the measurements must be repeated
If the runout of the disc does not disappear after replacement, the disc must be replaced with a new one

If you need to remove the disc from the hub, you must use the M8 (A) screw

")
")
")
")
")
")
")
")