
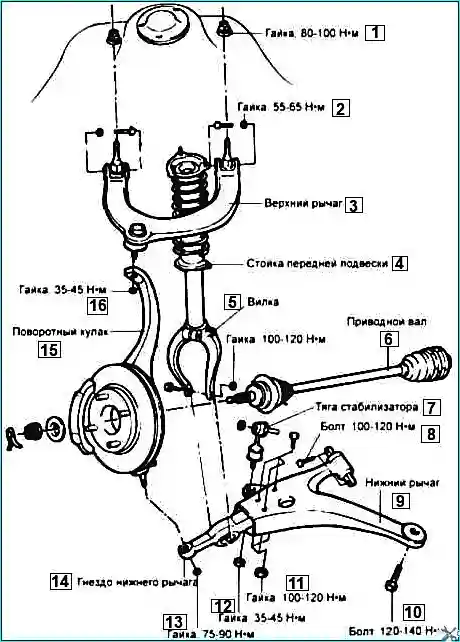
We remove the front suspension arms for replacement and repair
Preparing the car for the task
Removing and installing the lower arm of the front suspension
Remove the front wheel on the side of the work being performed
Loosen the nuts securing the ball joint, but do not unscrew them completely

Using a puller, squeeze the ball joint pin out of the lower arm socket

Removing the ball joint

Unscrewing the bolt securing the fork to the lower arm socket

Disconnect the stabilizer rod from the lower arm

Unscrew the two bolts securing the lower arm bushing "A"

Unscrew the bolt securing the lower arm bushing "G"
Remove the steering gear
Remove the anti-roll bar
Installation
Install the stabilizer rod so that the distance "A" is equal to the standard value

Standard value "A" = 3-5 mm
Then installation is carried out in the reverse order
Disassembling the lower arm
Removing the connector from the lower arm

Using a press, remove the shock absorber mounting sleeve

Using a press, remove the lower arm bushing
Checking the lower arm
Check the bushing for wear and deterioration
Check the lower arm for bending or damage
Check the ball joint dust cover for cracks
Check the condition of all bolts

Check the torque required to turn the lower arm ball joint journal.
If there are cracks in the protective boot, replace it and add grease to the joint.
Swing the lower arm ball joint journal from side to side several times.
Measure the torque required to turn the lower arm ball joint journal.
Torque: 0.1–0.4 Nm
If the torque is below the permissible values, replace the ball joint.
If the torque exceeds the permissible values, the ball joint can be reused if the torque value does not exceed evises 1.5 Nm.

Check the torque that must be applied to turn the stabilizer link ball joint journal.
If there are cracks in the protective boot, replace it and add grease to the joint.
Swing the stabilizer link ball joint journal from side to side several times.
Tighten the self-locking nut onto the ball joint journal and then measure the torque the moment required to rotate the ball joint journal.
Torque: 1.7–3.2 Nm
If the torque exceeds the permissible values, replace the stabilizer link.
If the torque is significantly lower than the permissible value, the ball joint can be used repeatedly if it does not jam and does not have excessive play.
Assembling the lower arm

Using a press and suitable attachments, press in the installation shock absorber bushing

Place the lower arm bushing "G" at the angle indicated in the figure

Press in lower arm bushing
Install the connector on the lower arm
Removing, checking and installing the upper arm of the front suspension
Prepare the car for the task and remove the front wheel on the side of the work being performed
Loosen the nuts securing the ball joint, but do not unscrew them completely

Using a puller, squeeze the ball joint pin out of the upper arm socket

Unscrew the two nuts securing the upper arm of the front suspension

Removing the upper arm of the front suspension
Installation is carried out in the reverse order
Checking the upper arm
Check the bushing for wear and deterioration.
Check the upper arm for bending or breakage.

Check the torque required to turn the upper arm ball joint journal.
If there are cracks in the protective boot, replace it and add grease to the joint.
Rock the lower arm ball joint journal from side to side several times.
Screw it on self-locking nut on the ball joint pin, and then measure the torque required to turn the ball joint pin.
Torque: 1.5-2.5 Nm
If the torque exceeds the permissible value, replace the ball joint.
If the torque is significantly lower than the permissible value, the ball joint can be used repeatedly if it does not jam or have excessive play.

")
")
")
")
")
")
")
")