
To remove the cylinder head, you do not need to remove the engine
To prevent damage to the paintwork of the body wings, you must use a special coating
To prevent damage to the cylinder head, wait until the engine cools down before removing it.
When removing the metal cylinder head gasket, be careful not to miss it or damage the contact surface of the block with the head.
When disconnecting the wiring, apply force directly to the connector, but not to the wire.
To avoid incorrect connection, it is necessary to apply marks to all wires.
Turn the crankshaft pulley to set the piston of the first cylinder to the top dead center (TDC) position.
Disconnect the negative and positive terminals (A) from the battery.

Remove the engine cover (A).

Remove the air duct (A).

Disconnect the ventilation hose (A), vacuum hose (B), electronic control unit connector engine (C) and remove the air filter assembly.

Remove the lower cover (A).
Unscrew the drain plug and drain the coolant.

Remove the upper radiator hose (A) and lower hose (B).
Remove the heater hose (A).

Disconnect the VIS connector (A), OPS (B), knock sensor (C) and the air conditioner switch connector.

Disconnect the intake valve connector (A).

Disconnect the injector connectors (A) and ignition coils (B).

Disconnect the connectors of the electronic control of ignition timing (A) and the absolute air pressure sensor (B)

Disconnect the connectors of the idle air control valve (A), throttle position sensor (B) and mass air flow sensor (C), then remove the cable.

Disconnect the connectors of the camshaft position sensor (A), fuel hose (B), vacuum brake booster hose (C) and positive crankcase ventilation hose (D).

Disconnect the positive crankcase ventilation hose (A), electronic ignition timing control (B), condenser (C), crankshaft position sensor (D), camshaft position sensor (E) and brake booster vacuum hose (F).

Remove the thermostat assembly (A).

Remove the timing chain.
Remove the intake and exhaust manifolds.
Remove the intake and exhaust sprockets.
Remove the camshaft.

Remove the front camshaft bearing cover (A).

Remove the upper exhaust camshaft bearing (A).

Remove the bearing cover (A) as shown in the figure.

Remove the camshaft (A).

Remove the lower bearing of the exhaust camshaft (A)

Remove the oil pressure adjusting valve (A)

Remove the exhaust valve.
Loosen the cylinder head bolts, then remove the cylinder head.
Using the special tool, loosen the 10 cylinder head bolts in the order shown in the figure
Installation in the wrong order may result in damage to the cylinder head.
Remove the cylinder head from the guide pin on the cylinder block and place it on wooden blocks.
Be careful not to damage the mating surfaces of the head and cylinder block.
Remove the cylinder head gasket.
Installing the cylinder head
Wash all parts before installation.
Always use a new cylinder head gasket and exhaust and intake manifold gaskets
Always use new head bolts cylinder block
The cylinder head gasket is metal, be careful not to bend it before installing.
Turn the crankshaft clockwise to set the piston of the first cylinder to the TDC position.

Install the filter.
Keep the filter clean

Install the cylinder head gasket (A) on the cylinder block.
Be careful with the installation order.
Apply sealant to the mark (B).
After applying the sealant, the cylinder head must be installed within 5 minutes.
Install the cylinder head carefully so as not to damage the gasket.

Install the cylinder head bolts.
Apply a thin coat of engine oil to the threads and under the heads of the cylinder head bolts.
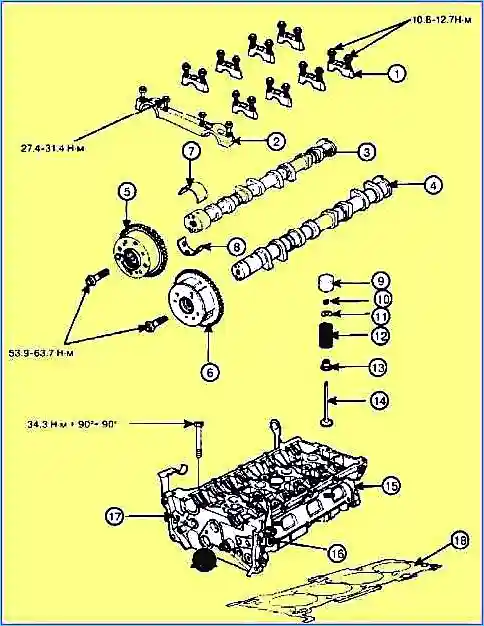
Using an Allen key, install and tighten the 10 cylinder head bolts and washers in the order shown in the illustration. Tightening torque: 34.3 Nm + 90˚ + 90˚.

Install the valves. Tightening torque: 9.8 - 11.8 Nm.
Do not damage or drop the valves.
Keep the filter clean.
When the valves are installed on the engine, do not move the engine while holding the valves with the bracket.
Install the camshafts.
Apply a thin layer of engine oil to the camshaft bearings.

Install the lower exhaust camshaft bearing (A).

Install the camshafts (A).

Install the upper exhaust camshaft bearing shell (A).

Install the bearing caps in their original position.
Tightening order: group A —> group B —> group C.
Tightening torque:
- step 1: M6: 5.9 Nm, M8: 14.7 Nm,
- step 2: M6: 10.8 - 12.7 Nm, M8: 27.5 - 31.4 Nm.

Install the thermostat assembly (A). Tightening torque of bolts and nuts: 18.6 - 23.5 Nm.
First install the thermostat assembly and water inlet hose to the water pump, then tighten the inlet hose nuts.
Always use new O-rings.
Install the timing chain.
Check the valve clearance.
Install the cylinder head cover.

The hardened sealant located on the upper surface between the chain cover and the cylinder head must be removed before installing the cylinder head cover.
After applying the sealant, assembly must be completed within 5 minutes. The thickness of the sealant strip is 2.5 mm.

Burning and blowing must be done no more than 30 minutes after installing the cover.
Tighten the cylinder head bolts as follows:
Tightening torque: step 1: 3.9 - 5.9 Nm, step 2: 7.8 - 9.8 Nm.
Do not reuse the cylinder head gasket.
Install the intake and exhaust manifolds.

Connect the connectors of the positive crankcase ventilation hose (A), electronic ignition timing control (B), condenser (C), crankshaft position sensor (D), camshaft position sensor (E), and brake booster vacuum hose.

Connect the brake booster vacuum hose (D), positive crankcase ventilation hose (C), fuel hose (B), camshaft position sensor (A).
Connect the ETC and MAP sensor connectors (B).

Connect the idle air control valve (A), throttle position sensor (B), and mass air flow sensor (C) connectors, then connect the throttle body wiring connectors flaps (D).

Connect the connectors of the injectors (A), throttle position sensor (B).

Connect the regulating valve connector (A).

Connect the VIS(A), OPS(B), knock sensor (C) and compressor switch (D) connectors

Install the heater hose (A).

")
")
")
")
")
")
")
")