
Checking the technical condition of the timing drive components
Sprockets, pulley
Check the camshaft and crankshaft sprocket, tensioner pulley and roller for wear and damage. Replace parts if necessary
Check the tensioner and roller for noise by turning them smoothly. Replace parts if necessary.
If there is an oil leak from the bearing, replace the tensioner and roller if necessary.
Drive Belt
Check the belt for oil or dust build-up.
Replace the belt if necessary.
Wipe off any dust with a dry cloth. Do not clean the belt with solvent.

Carefully inspect the belt when the engine is disassembled or the tensioner is replaced.
If the belt is clearly damaged, replace it.
Do not bend, twist or rotate the belt inward.
Avoid contact with water, oil, etc. on the belt.
Removing the timing belt

Remove the engine cover (A).
Remove the front right wheel with the tire.
Remove the wheel cover.

Remove the drive belt (A), pulley (B) and tensioner (C).

When removing the drive belt, secure the auto-tensioner pulley bolt with a special tool and turn it counterclockwise.
Remove the upper timing belt cover (A).
Align the pulley groove with the mark on the the drive belt cover by turning the crankshaft clockwise.

Check that the camshaft sprocket mark matches the mark on the cylinder head cover (cylinder No. 1 / TDC).

Remove the engine mount bracket.
Install a jack to support the engine.
Install a wooden block between the jack and the oil pan.
Remove the engine mount bracket (A).

Remove the crankshaft pulley (A).

Remove the lower drive belt cover (A).

Remove the engine mount bracket
After removal, a small coolant leak may occur at the location shown in the figure (B).

Remove the automatic tensioner of the drive belt (A).

Remove the drive belt (A).
mark the order of removing the drive belt.

Remove the tensioner arm in assembly (A) and pulley (B).
Remove the crankshaft sprocket
Installing the timing belt

Install the crankshaft gear.
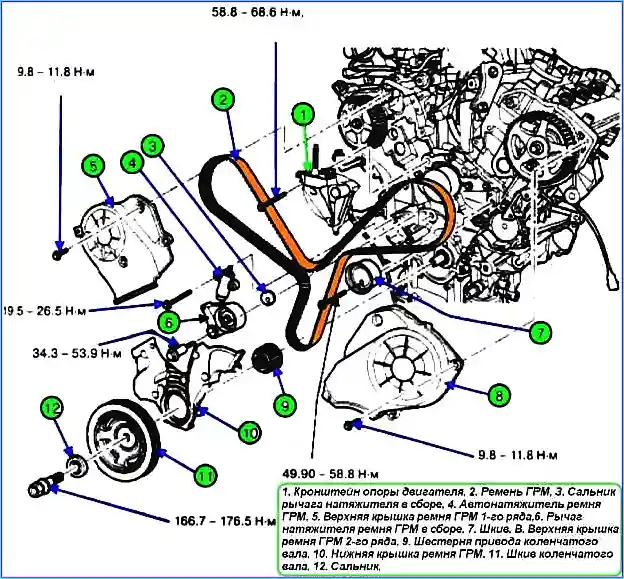
Install the tensioner arm assembly (A) and pulley (B).
Tightening torque:
- - tensioner arm: 34.3 – 53.9 Nm,
- - Bolt pulley: 49.0 — 58.8 Nm.

Align the marks on the camshaft and crankshaft sprockets.

Install the drive belt as follows: Crankshaft sprocket (A) ► Pulley (B) Exhaust camshaft sprocket 2nd row (C) ► Water pump pulley (D) ► Exhaust camshaft sprocket 1st row (E) ► Tensioner pulley (F).

Install the timing belt tensioner.
Do not install tensioner for 5 minutes.
Press the rod with a weight of 150 - 200 N.
If the rod does not move, smoothly insert the installation pin.
If the rod moves, press it 2 - 3 times so that the length is 2.9 mm (from the place where the 2 holes of the rod and the body are at the same level).
Check the rigidity.
If the rod does not move, insert the pin, replace the auto tensioner.

Do not release the auto tensioner.
Do not press the rod abruptly. Press the rod with a force of less than 4000 N.
Make sure that the auto tensioner is installed in the desired position.
In winter, store the auto tensioner indoors.

Remove the auto tensioner pin.
Check the belt tension.
Check crankshaft 2 turns clockwise and set the first cylinder to TDC.
After 5 minutes, measure the length of the rod. Standard value: 5 - 7 mm.

Check the location of the marks of each sprocket.

Install the engine mount bracket (A). Tightening torque: 58.8 ~ 68.6 Nm.
Check the length of the bolts.
Use only a torque wrench.
Install the lower drive belt cover. Tightening torque: 9.8 ~ 11.8 Nm.

Move slightly to the left of the bolt hole by pressing the left drive belt cover.
Install the crankshaft pulley (A). Tightening torque: 166.7 ~ 176.5 Nm.

Install the engine mount bracket (A). Tightening torque: 63.7 ~ 83.4 Nm.

Install the drive belt upper cover (A). Tightening torque: 9.8 ~ 11.8 Nm.
Install the belt tensioner (C). Tightening torque: 34.3 ~ 53.9 Nm.

Install the belt pulley and drive belt (A). Tightening torque: 34.3 ~ 53.9 Nm.
Install the right cover.
Install the front right wheel and tire.

Install the engine cover (A). Tightening torque: 7.8 ~ 11.8 Nm.

")
")
")
")
")
")
")
")