
We remove and disassemble the shock strut for repair or replacement of shock strut elements
The shock strut can be removed by placing the vehicle on a level surface
To remove the rack, you will need tools: wrenches for removing wheels, a jack, a support stand, wrenches for 8 and 17
We brake the car with a parking brake

Installing wheel chocks under the rear wheels

Loosen the wheel nuts

Remove the plug of the shock absorber rod

Loosen the nut of the upper mount of the rack, holding the stem from turning with the second key

Finally unscrew the nut of the upper shock mount

Remove the thrust washer

Raise the front of the car and remove the wheel

When removing the right shock strut, unscrew the bolt securing the front wheel speed sensor bracket

Remove the wire from the holder on the stand
On vehicles equipped with ABS, wheel speed sensors are located on both sides of the vehicle

While holding your finger from scrolling, unscrew the nut securing the upper hinge of the stabilizer strut

Disconnect the hinge pin from the shock strut bracket

Unscrew the nut securing the shock strut to the steering knuckle and remove the bolt from the hole
We also unscrew the second nut and remove the bolt securing the shock strut to the steering knuckle

Holding the strut, move the steering knuckle away from the shock strut

Remove the shock strut from the car
After repair or replacement, install the shock strut in reverse order
After assembly, we check the installation angles of the wheel alignment
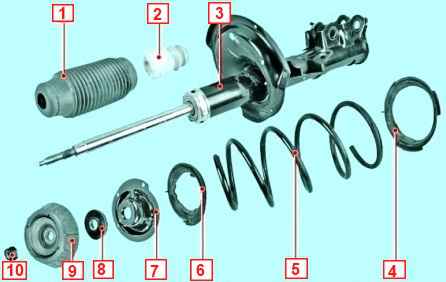
Disassembling and assembling the shock strut
We need keys for 8, 17 and 21

Spring ties will also be required
Remove the shock strut as described above

Installing the spring tensioner
Compress the spring

We unscrew the shock strut rod nut, holding the rod from turning with the second key

And remove the nut

Remove the upper shock strut support

Remove the thrust bearing

Remove the spring support cup

Remove the front suspension spring

Remove the protective cover of the shock strut rod

Retrieve the compression stroke buffer from the protective case

Remove the upper spring spacer

Remove the lower spring spacer
Inspecting the shock strut parts
Cracks, deformation and destruction on the rack body are not allowed.

Set the shock strut to a vertical position and lower and raise the shock absorber rod as far as it will go several times
When moving the stem, make sure that it moves without dips, sticks or bumps.
If fluid leaks are found, replace the shock absorber
This check of the shock absorber is approximate, for a more accurate assessment of its condition, you need to contact a special service.
Shock absorbers must be replaced in pairs

Replacing the compression stroke buffer if it is damaged
Check the support bearing, if it has play or sticks, then we replace it

If traces of collision of coils, cracks and deformation are found on the spring, then we replace it
Install all parts in reverse order

When assembling the shock strut, we fix the gaskets on the spring with adhesive tape or electrical tape for secure fixation at the installation site

When installing the spring, you need to ensure that the end of the lower coil rests against the special protrusion of the lower spring cup
Install the rack as described above and check the wheel angles.

")
")
")
")
")
")
")
")