
In the article, we will consider the replacement of pads, brake drums, working cylinders, brake discs of the rear brake mechanism
Replacing drum brake pads
Before replacing the brake pads, check the brake fluid level in the brake master cylinder reservoir
We turn on the first gear in a manual transmission or "P" in an automatic transmission.
Installing wheel chocks under the front wheels
Loosen the rear wheel nuts on the side of the work being performed
Raise the rear of the car and install supports under the body
Finally unscrew the wheel nuts and remove the wheel

We unscrew the screw securing the brake drum

Remove the brake drum

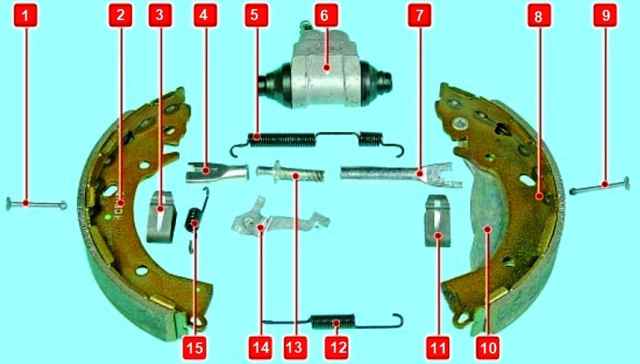
Remove the spring end of the lash adjuster lever from the front shoe

Remove the spring

We unhook the bent end of the upper coupling spring from the front block with a screwdriver

Remove the spring

Remove the lower return spring

Remove the gap adjuster lever

Press on the spring plate and turn the support post rod a quarter of a turn

Remove the spring plate

Remove the support rod

Remove the front brake pad

Remove the spacer bar assembly with the gap adjuster

Remove the rear brake shoe and disconnect the tip of the parking brake cable from the expansion lever
We inspect the parts of the brake mechanism and replace the defective parts
We apply refractory grease for brake mechanisms to the friction points of the front and rear brake pads on the brake shield
We compress the pistons of the working cylinder with sliding pliers or special devices and install the brake pads in the reverse order
Installing the brake drum
We adjust the gap between the pads and the drum by pressing the brake pedal several times. Each time you press it, you should hear the knob click. If the clicks stop, the gap is set
Reinstall the wheel and check the ease of rotation
In the same way, we replace the pads on the other side
After installing the brake pads, we adjust the parking brake system
Replacing disc rear brake pads
We turn on the first gear in a manual transmission or "P" in an automatic transmission.
Installing wheel chocks under the front wheels
Loosen the rear wheel nuts on the side of the work being performed
Raise the rear of the car and install supports under the body
Finally unscrew the wheel nuts and remove the wheel

We unscrew the upper and lower bolts of the caliper guide pins, keeping the fingers from scrolling with the second key

Remove the movable bracket from the disc without disconnecting the brake hose and fix the bracket with wire on the suspension parts, preventing the hose from twisting

Remove the outer shoe from the shoe guide

Removing the inner brake pad

Pry off with a screwdriver

And remove the lower and upper retaining plates from the guide pads
Whenever you change the brake pads, be sure to check the condition of the rubber protective covers of the guide pins and the ease of movement of the caliper relative to the brake pad guide.
If movement is difficult, grease the guide pin and its boot.
Install a special tool on the caliper and push the piston into the slave cylinder.
In the absence of a fixture, you can press the piston using sliding pliers.
Be careful not to damage the piston boot.
Install the retaining plates and brake pads into the guides, and then install the remaining parts in the reverse order of removal.
To prevent self-retraction of the caliper guide pin bolts, lubricate their threads with an anaerobic thread locker before installation.
Depress the brake pedal all the way a few times to adjust the gaps in the brake mechanism that appeared after the pistons were pressed into the cylinders.
Install the wheel.
Replace the brake pads on the other rear wheel in the same way.
Check and, if necessary, top up the brake fluid level in the master cylinder reservoir.
After replacing worn-out brake pads with new ones, do not rush to immediately drive onto busy highways.
It is possible that at the first intensive braking you will be unpleasantly surprised by the low efficiency of the brakes, although the pads were branded.
Brake discs also wear out, and new pads only touch them at the edges, practically without braking.
Choose a quiet street or passage without cars and slow down gently several times so that the pads get used and begin to fit the entire surface. At the same time, evaluate the effectiveness of the brakes.
Try not to brake hard for at least the first 100 km.
If the unprocessed pads get very hot, the top layer of their pads burns, and the brakes will not be as effective as possible for a long time.
Replacing the drum brake slave cylinder
We turn on the first gear in a manual transmission or "P" in an automatic transmission.
Installing wheel chocks under the front wheels
Loosen the rear wheel nuts on the side of the work being performed
Raise the rear of the car and install supports under the body
Finally unscrew the wheel nuts and remove the wheel

We clean the place of fastening of the brake pipeline and the bolts of fastening of the working brake cylinder from the reverse side

Remove the brake drum as described above

Unscrew the nut securing the brake pipe to the working cylinder

And take the phone aside. We muffle the tube hole with a plug from the air release valve
After long-term operation, the brake pipe nut "grows" with the pipeline in one piece, so when you try to unscrew the nut, the pipeline twists and breaks.
In this case, just loosen the pipeline nut a little, then unscrew the cylinder mounting bolts and disconnect it from the pipeline by screwing the cylinder from its nut.
After disconnecting the cylinder from the pipeline, the mobility of the nut can be restored by moistening it with brake fluid and turning the nut alternately in both directions with a wrench.

We unscrew the bolts of the working cylinder

Remove the slave cylinder, slightly spreading the brake pads to the side
Install the slave cylinder and all parts in reverse order
After installation, we bleed the brake system, as described in the article - “How to change the brake fluid and bleed the Hyundai Solaris brakes”
Replacing the rear disc brake caliper
We turn on the first gear in a manual transmission or "P" in an automatic transmission.
Installing wheel chocks under the front wheels
Loosen the rear wheel nuts on the side of the work being performed
Raise the rear of the car and install supports under the body
Finally unscrew the wheel nuts and remove the wheel
Unscrew the bolt fitting of the brake hose and disconnect the brake hose from the caliper
We plug the end of the hose to prevent leakage of brake fluid

Remove the tip of the cable from the parking brake lever
Remove the cable from its mounting bracket

We unscrew the bolts securing the guide pads to the bracket on the rear suspension arm and remove the caliper
Install the caliper in reverse order
After installation, we bleed the brake system

")
")
")
")
")
")
")
")