For cars with manual transmissions, a dry single-plate clutch with a central diaphragm spring is installed
The clutch is located between the engine and the gearbox and serves to disconnect and connect the flywheel located on the engine crankshaft and the gearbox input shaft.
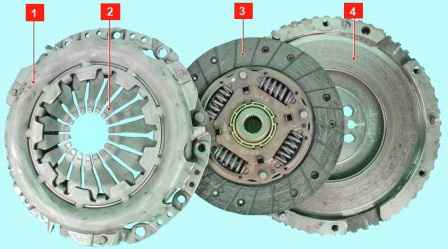
The clutch consists of a driven (friction) disc, a clutch cover with a pressure plate and a diaphragm spring, as well as a clutch release mechanism.
The pressure plate is mounted in a stamped steel casing, attached with six bolts to the engine flywheel.
The driven disc is mounted on the splines of the input shaft of the gearbox and is clamped by a diaphragm spring between the flywheel and the pressure plate.
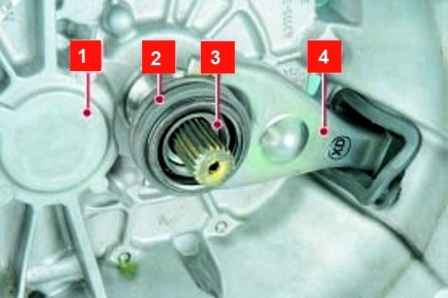
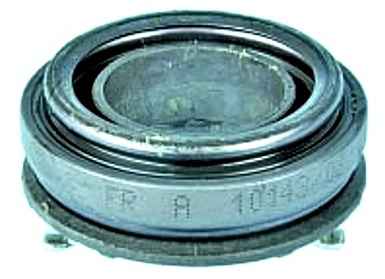
The clutch release bearing is mounted on a guide sleeve pressed into the clutch housing and moves along the sleeve with a fork, which in turn drives the clutch release hydraulic slave cylinder.
Hydraulic clutch release includes the following:
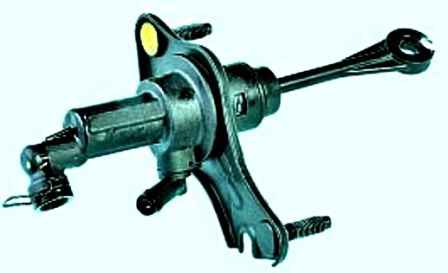
- the main cylinder installed in the engine compartment on the bulkhead;
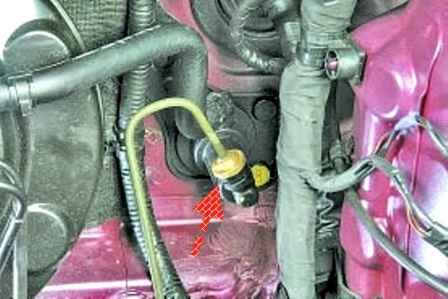
- the working cylinder located on the gearbox housing;
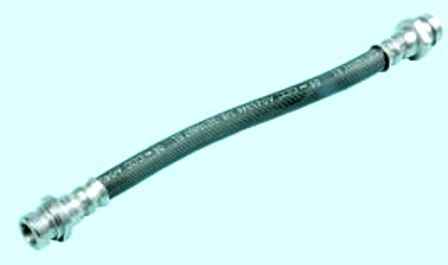
- - a pipeline consisting of a tube and an intermediate hose connecting the main cylinder to the working cylinder;
- - clutch pedal, the bracket of which is attached to the body.
The pedal returns to its original position by a spring.
The master cylinder is connected by a hose to a reservoir mounted on the brake master cylinder (the reservoir is common to both master cylinders).
The hydraulic clutch release uses brake fluid.
Adjustment of the clutch release actuator in operation is provided.
In order for the clutch to serve for a long time and without fail, do not constantly keep your foot on the clutch pedal.
This bad habit is often acquired while learning to drive in driving schools for fear of not having time to disengage the clutch while the car is stopped.
In addition to the rapid fatigue of the foot, which is all the time on the pedal, the clutch is at least a little, but squeezed out, and the driven disk slips and wears out.
In addition, despite the fact that the release bearing is designed to operate in constant rotation mode, even with a light pedal pressure, it is under increased load and its life is reduced.
For the same reason, it is not recommended to keep the clutch off for a long time (for example, in traffic jams).
If you don't have to move right away, it's best to move the gear lever to neutral and release the pedal.
Clutch slippage can be determined by the tachometer. If, while driving, with a sharp press on the accelerator pedal, the speed rises sharply, and then decreases slightly and the car starts to accelerate, then the clutch needs to be repaired.
Checking and adjusting the clutch pedal travel
Checking the clutch pedal stroke to find out the causes of the malfunction clutch
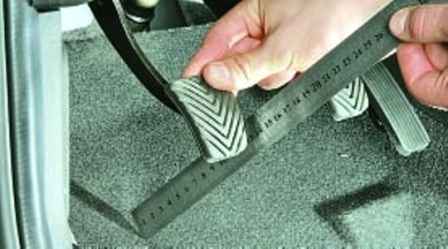
Using a ruler, check the pedal free play
To do this, press the pedal until resistance appears.
The normal value should be within 6-13 mm.
Height from pedal to floor should be 140±5mm.
If the free play of the pedal is greater, the clutch may not be clearly disengaged (the clutch "leads").
If the free play is too small or completely absent, the clutch does not fully engage (the clutch slips).
If the free play of the pedal differs from the nominal value
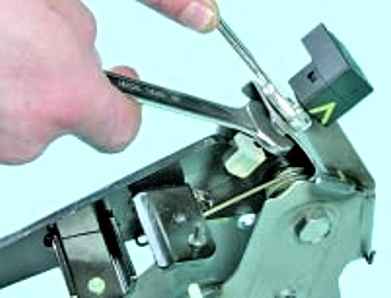
We loosen the locknuts on the pedal assembly, and by measuring the position of the clutch pedal stroke start sensor, we achieve the required free play value.
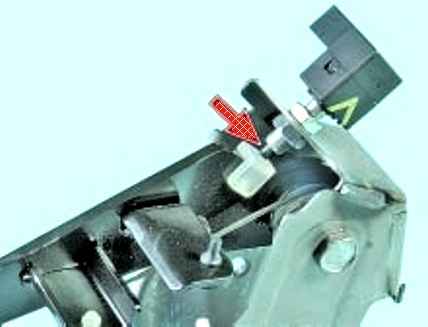
A small gap should appear between the clutch pedal and the clutch pedal start sensor threads, the nominal gap should be 0.5–1.0 mm.
If the clutch release pedal cannot be adjusted, bleed the hydraulic drive or replace the clutch.
Bleeding the hydraulic clutch
If the clutch does not fully disengage ("leads") when the pedal is pressed all the way down, which is accompanied by a characteristic grinding of gears when reverse gear is engaged, air may have entered the clutch hydraulic actuator. Remove it by bleeding the hydraulic drive.
In addition, pumping is performed when the hydraulic drive is filled with liquid after its replacement or repair of system components associated with system depressurization.
You will need: brake fluid, bleed hose, 10 wrench, container for drained fluid.
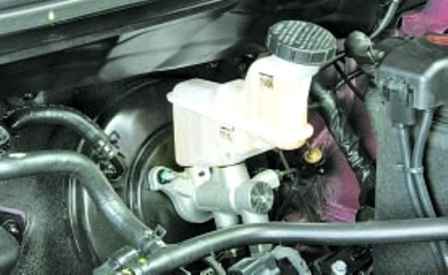
Check the fluid level in the master cylinder reservoir (the reservoir is common to both master cylinders) and top up if necessary.
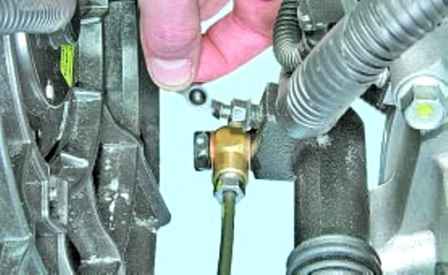
Remove the protective cap from the clutch slave cylinder valve to bleed air.
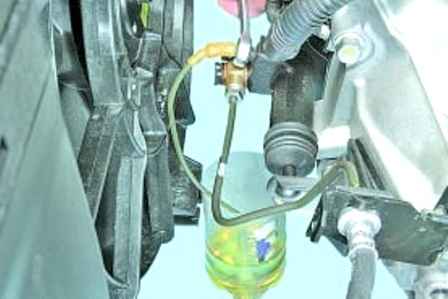
Put a hose over the valve and lower its end into a container with a small amount of brake fluid.
Have an assistant depress the clutch pedal 4 or 5 times at 2-3 second intervals and then keep it depressed. Turn the valve ¾ turn.
Liquid with air bubbles will flow from the hose into the container.
Close the valve and ask to release the clutch pedal.
Repeat steps 3 and 4 several times until the liquid starts to come out of the hose without air bubbles.
When bleeding the hydraulic drive, periodically check the fluid level in the reservoir of the main brake cylinder.
Do not let the liquid level in the tank fall below 25 mm from its bottom.
Top up the liquid in time, otherwise, when the bottom of the tank is drained, air will enter the system and pumping will have to be repeated again.
Close the valve, put on the protective cap and, if necessary, add fluid to the reservoir of the main brake cylinder.
Possible clutch failures and solutions
Remedy elimination
Incomplete clutch disengagement
Clutch pedal travel reduced - Adjust clutch release actuator
Distortion of the driven disk (end runout more than 0.5 mm) - Straighten the disk or replace with a new one
Irregularities on the surfaces of the friction linings of the driven disc - Replace the linings or the driven disc assembly
Loose rivets or breakage of driven disc friction linings - Replace linings, check disc end runout
Jamming of the hub of the driven disk on the splines of the input shaft of the gearbox dachas - Clean the splines, cover with grease LSTs-15.
If jamming is caused by crushed or worn splines, replace the input shaft or driven disc
Air in the hydraulic drive system - Bleed the system
Leaking clutch master or slave cylinder - Replace master or slave cylinder
Loose pressure spring rivets - Replace clutch cover with pressure plate assembly
Skewing or warping pressure plate - Same
Incomplete clutch engagement
Increased wear or burnt disc friction linings - Replace friction linings or driven disc assembly
Oiling the friction linings of the driven disk, the surfaces of the flywheel and the pressure plate - Thoroughly wash the oiled surfaces with white spirit, eliminate the causes of oiling of the disks
Clutch release actuator damaged or sticking - Troubleshoot causing sticking
Clutch jerks
Seizure of the driven disk hub on the input shaft splines - Clean the splines, lubricate with LSTs-15 grease.
If jamming is caused by wrinkling or worn splines, replace input shaft or driven plate if necessary
Breakage or reduced elasticity of driven disc damper springs - Replace driven disc assembly
Oiling the friction linings of the driven disk, the surfaces of the flywheel and the pressure plate - Thoroughly wash the oiled surfaces with white spirit and eliminate the cause of the oiling of the disks
Clutch release mechanism sticking - Replace deformed parts. Eliminate causes of jamming
Increased wear on the friction linings of the driven disc - Replace the driven disc
Loosening the rivets of the friction linings of the driven disk - The same
Pressure plate surface damage or warpage - Replace clutch cover with pressure plate assembly
Increased noise when disengaging the clutch
Worn, damaged or leaking release bearing - Replace bearing
Breakage of the plates connecting the pressure plate to the casing - Replace the clutch casing with the pressure plate assembly


