
An LG 08L5 alternator is installed on the car
The conversion of electric current into direct current is carried out by the rectifier unit

The voltage regulator and the brush assembly form a common unit, which is attached to the rear cover of the generator.
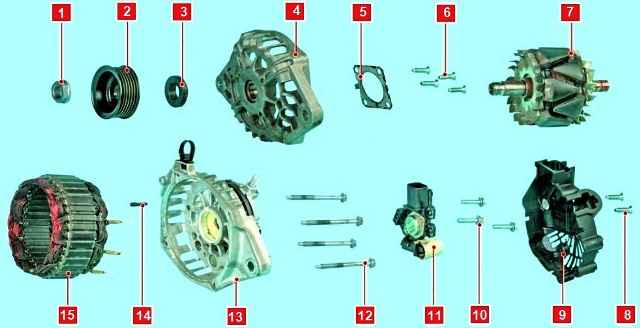
Generator details: 1 - pulley fastening nut; 2 - pulley; 3 - remote ring; 4 - front cover; 5 - pressure plate of the bearing; 6 - screw for fastening the pressure plate; 7 - rotor; 8 - casing fastening screw; 9 - casing; 10 - a bolt of fastening of a brush holder; 11- brush holder with voltage regulator; 12 - coupling bolt; 13 - back cover with a rectifier unit; 14 - locating pin; 15 - stator
The stator and covers are tightened with four bolts.
The rotor shaft rotates in bearings that are installed in the covers

When the ignition is switched on, the voltage for excitation of the generator is supplied to the terminal "L" of the voltage regulator
There is an indicator in the instrument cluster to control the battery charging.
When the ignition is turned on, the indicator should be on, after starting the engine it should go out if the generator is working.
If the signaling device is lit brightly or at half heat, then this indicates a malfunction of the generator.
Table of possible malfunctions and troubleshooting methods at the end of the article
Removing and installing the generator
Disconnect the negative battery terminal
Remove the right engine mudguard

Turn the tensioner roller counterclockwise with a wrench to loosen the belt tension

Remove the belt from the tensioner pulley

Remove the accessory drive belt
The belt may not be completely removed, but it is better to remove and inspect for defects:
- - signs of wear of the toothed surface, cracks, delamination of fabric from rubber;
- - loosening or delamination on the end surfaces of the belt;
- - traces of oil on the surface of the belt
A belt with traces of oil on any of its surfaces must be replaced, oil quickly destroys rubber
Find out the cause of the oil ingress and eliminate it
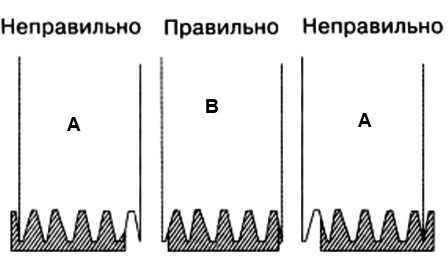
When installing the belt, make sure that the inner grooves of the pulleys remain free

Press the retainer of the wiring harness block

Disconnect the block from the generator

Disconnect the holder together with the wiring harness from the generator

Opening the protective cap of the generator output

Unscrew the nut securing the power wire tip

Disconnect the power wire from the generator

We unscrew the bolt of the lower mounting of the generator

Remove the bolt

We unscrew and remove the upper bolt securing the generator to the bracket

Remove the generator from the car
Install the generator in reverse order
After installing the belt, turn the crankshaft three full turns so that the accessory drive belt is in the correct position.
Possible malfunctions of the generator and methods of elimination
Fault - Remedy
The battery is being recharged (boiling):
Faulty voltage regulator or rectifier unit - Replace the regulator unit
Severe voltage drop in the generator-battery circuit - Check, clean or replace the contact group in the ignition switch, check the contacts in the fuse and relay boxes, connectors. Check the ground connections of the generator housing
The generator does not charge the battery or does not fully charge it:
Oxidation of the battery terminals - Strip, fix and lubricate the cable lugs with petroleum jelly
Battery defective - Replace battery
Auxiliary drive belt loose - Replace belt or tensioner
Faulty voltage regulator or rectifier unit - Replace regulator-brush holder unit
Battery discharge indicator does not go out after starting the engine:
Accessory drive belt loose - Replace belt
The alternator is faulty (the alternator brushes are worn out or do not fit snugly against the contact rings of the brush)
Generator excitation winding burned out - Replace or repair generator
Short to ground wire between generator and alarm - Insulate or replace wire
When the ignition is turned on, the battery discharge indicator does not light:
Open wire between alternator, ignition switch and warning light - Repair open

")
")
")
")
")
")
")
")