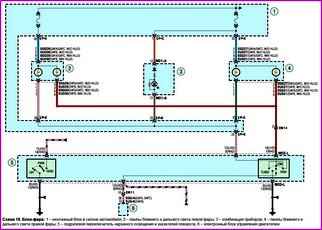
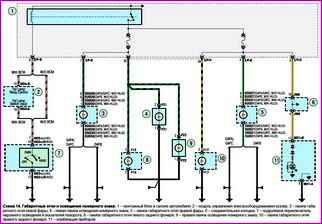
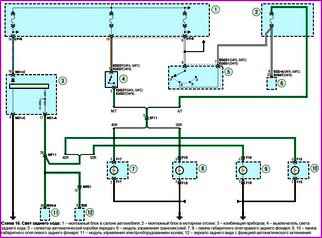
On cars, block headlights are used that combine low / high beam lamps, position lights and direction indicators. The headlights use the so-called transparent glass optics.
The headlight cover is completely transparent and does not have a diffusion function.
It is made of plastic, which is more transparent than glass, and is also much lighter than a glass cover.
A layer of protective varnish protects it from minor damage (scratches).
There are no color filters in the direction indicators, instead lamps with glass of the corresponding color are used.
The dipped and main beam headlights are switched on by the left steering column switch for outdoor lighting using relays located in the mounting block in the engine compartment.
Control voltage is applied to the high beam relay coils from the ambient light switch when it is in the headlight on position.
Regardless of the position of the outdoor light switch, you can turn on the high beam headlights briefly by moving the switch lever towards you.
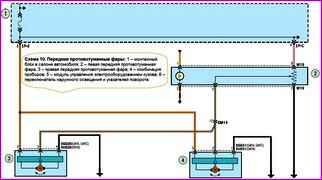
Fog lights
Fog lights are installed on the car at the bottom of the front bumper.
They can only be turned on when the outside lights are on.
Checking and adjusting headlights
Check and adjust the headlights on an equipped vehicle (with a fully filled fuel tank, a set of tools and a spare wheel).
In the described way, using the marked screen, only headlights with halogen incandescent lamps can be adjusted.
To adjust the headlights with gas discharge lamps, contact a specialized service that has optical stands.
You will need the "8" key.
Pre-check and, if necessary, adjust the air pressure in the tires.
Move the car perpendicular to a smooth wall (e.g. in a garage) at a distance of 3 m.
Place a weight of 75 kg on the driver's seat.
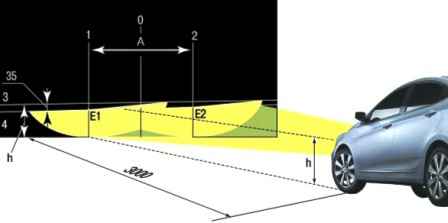
Mark the screen on the wall as shown.
The longitudinal plane of symmetry of the car must pass along line 0 on the screen.
Vertical lines 1 and 2 are equidistant from line 0.
The distance "A" between lines 1 and 2 must be equal to the distance between the centers of the dipped beam lamps.
Rock the car from the side so that the suspension springs self-adjust.
Measure the height of the headlight centers from the ground on the vehicle. This will be the distance h on the screen.
Set the headlight dimmer control on the instrument panel to the position appropriate for the load of the car with one driver.
Turn on low beam.
It is recommended to adjust the direction of the light spot for each headlight individually.
Cover the second headlight with an opaque material during adjustment.
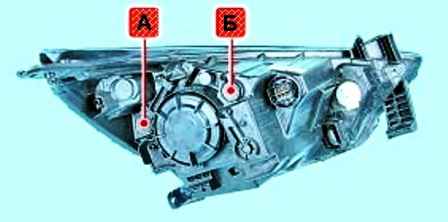
This is how the headlight adjustment screws are located horizontally “A” and vertically “B”.
Shown on left headlight assembly removed from vehicle.
Open the hood and turn adjusting screw "A" to adjust (if available) The position of the light spot on the screen for each headlight is horizontal and, by turning the adjusting screw B, vertically.
Headlights are considered adjusted when the upper borders of the left parts of the light spots coincide with line 4, and the vertical lines 1 and 2 pass through the points E1 and E2 of the intersection of the horizontal and inclined sections of the light spots.
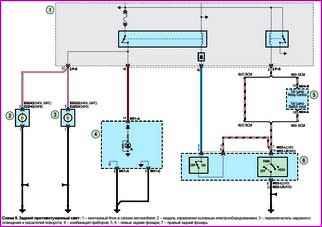
Rear lights
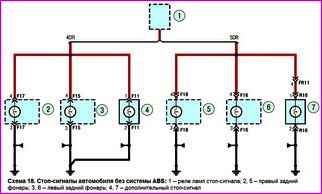
Rear lights include direction indicators, parking lights, brake lights, a fog light (in the left lamp) and a reverse lamp (in the right lamp).
An additional brake light is installed at the top of the rear window.
The rear fog light can only be turned on with the switch when the low beam is on.
When you turn off the headlights, the rear fog light turns off automatically.
Indicators
Right or left turn indicators are switched on by the left steering column switch.
The turn signals turn off manually or automatically when the steering wheel is turned back. In alarm mode, the alarm switch turns on all direction indicators.
Electrocorrector for headlights
Electric headlight corrector is installed on cars, which allows you to change the direction of the headlight beam in the vertical plane depending on the load of the car.
If the headlights suddenly begin to burn dimly, and when the turn signal is turned on, the parking light lamp starts flashing, restore the contact of the "mass" wire with the body.
Possible malfunctions of lighting and light signaling and methods of elimination
Fault - Remedy
Individual lamps of headlights and lanterns do not light
Fuses blown - Check circuit and replace fuses
The filaments of the lamps are burnt out - Replace the lamps
Damaged wires, oxidation of wire ends - Check, replace damaged wires
Dipped/high beam headlights do not turn on
The filaments of the lamps are burnt out - Replace the lamps
Switches defective - Replace outdoor lighting control unit
Stop light not working
Faulty brake light switch - Replace switch
Steering column levers not fixed
Destruction of lever latches - Replace damaged switch
Turn signals don't turn off automatically after cornering
Damage to the return mechanism of the turn signal switch lever to its original position - Replace the turn signal and headlight switch
The turn signal indicator flashes twice as fast
One of the turn signal bulbs is burned out - Replace the bulb
Lamps used on the car
Installation location - Designation (power, W)
- Lamp low/high beam H4 (55/60)
- Turn signal lamp PY21W (21)
- Rear turn signal bulb P21W (21)
- Front fog light bulb GE881 (27)
- Fog lamp in rear light PR21W (21)
- License plate light bulb W5WL/L (5)
- W16W reversing and brake light bulb (16)
- W5WL/L front position light bulb (5)
- Rear and brake light bulb 5W/P21 (21/5)
- Luggage compartment light bulb W5W (5)
- FESTOON interior lamp (8)


