
We examined the engine disassembly in the article - "Engine disassembly".
There we looked at how to remove the crankshaft.
Let's consider how to disassemble the crankshaft itself and inspect it.
Before disassembling the crankshaft, wash it with gasoline and dry it.
Inspect the crankshaft.
If it has cracks or severe scuffing, then the crankshaft cannot be repaired.
We disassemble the crankshaft for both replacement and boring.

With a three-fingered puller, we press the drive gear together with the thrust washer

There is a chamfer on the thrust washer, during assembly it is necessary that the chamfer of the washer is installed to the counterweight of the crankshaft

Knock out the gear key with a thin chisel

Remove the thrust washers limiting the axial movement of the crankshaft
Two pins keep the front washer from turning.

One pin is installed in the block, and the second on the cover of the first main bearing

The rectangular ledge of the rear washer is installed in the groove on the other side of the cover of the first main bearing
If there are minor marks on the main and connecting rod journals, scratches, scuffs, or the ovality of the journals exceeds 0.01 mm, the journals must be ground to the repair size.
After grinding, the necks must be polished.
Brush the sharp edges of the chamfers of the oil channels with an abrasive cone.
The repair dimensions of the shaft journals are shown in the table.
Nominal and maximum permissible dimensions of the motor mod. 402

Fitting the mating parts of the crankshaft

After boring, we unscrew the plugs of the crankshaft channels.
We flush the channels with diesel fuel or kerosene and blow with compressed air.

We wrap the plugs and tighten with a torque of 38–42 Nm (3.8–4.2 kgf m)

With a beard we kern the edges of the plugs
After grinding the crankshaft journals, it is necessary to install the main and connecting rod bearing shells of the appropriate repair size.
Inspect the main bearing shells.
If they have marks, scuff marks, scratches, delaminations, inclusions of solid particles, etc., replace the liners.
Inspect the flywheel.
If the teeth of the flywheel crown are damaged, there are scuffs, scratches, etc. on the surface adjacent to the clutch disc, replace the flywheel.
If the flywheel is cracked, it should also be replaced.

Inspect the crankshaft oil seal in the camshaft cover.
If the oil seal is damaged (tears, tears, heavy wear of the working edge, etc.), it must be removed from the cover with a screwdriver and a new one must be pressed in.
If the vehicle has a high mileage, it is recommended to replace the oil seal.

Replace the packing of the crankshaft rear seal in the main bearing bed and in the holder.
Remove the old packing and put in a new one about 120 mm long.
Cut the ends of the packing so that it protrudes 0.5–1.0 mm above the plane of the bed and the holder (We perform this if there is a packing on the engine, if the gland does not need to be performed, the gland must be replaced).
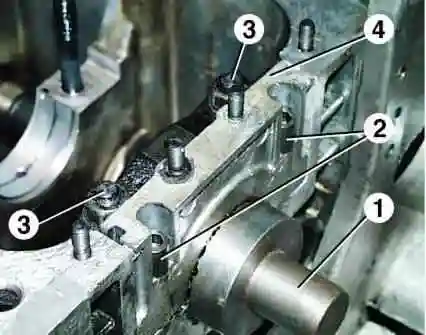
Compress the packing, to do this, put a mandrel 1 in the bearing bed, install the holder 4 and the main bearing cover and tighten the nuts 3 and bolts 2.
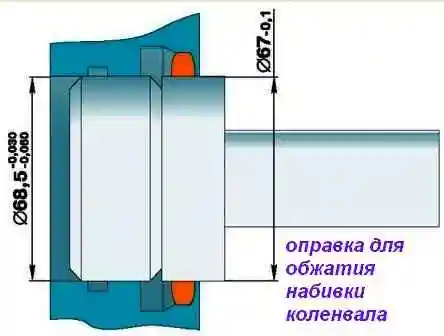
In the figure, the dimensions of the mandrel for crimping the crankshaft packing.

Replace rubber seals 1 (flags).
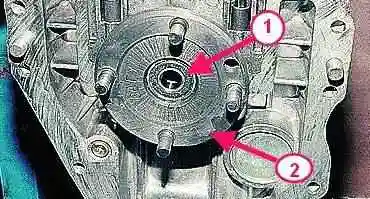
In the hole of the crankshaft on the flywheel side, the input shaft toe bearing, closed type, is pressed in.
Inspect the bearing, if defects are found (large play, jamming, damage to protective rings, etc.), press it out of the crankshaft using a puller.
Press the new bearing flush with the bottom edge of the chamfer of the hole in the crankshaft.

")
")
")
")
")
")
")
")