
Let's look at a Hyundai car as an example
Caution:
- - To avoid damaging painted surfaces, cover the front fenders with protective covers.
- - Be careful when disconnecting hoses; do not spill oil or other liquids.
- - Cap disconnected pipes or hoses to prevent foreign particles from getting inside.
Note: When disconnecting hoses, always make alignment marks first so that the hoses are in their original position when reconnecting.
- 1. Disconnect the negative battery cable.
- 2. Remove the engine trim cover.
- 3. Remove the air cleaner.
- 4. (Pre-2009 models) Remove the air intake duct and air cleaner housing.
- a) Remove the mass air flow sensor.
- b) Disconnect the ventilation hose from the air cleaner housing.
- c) Disconnect the engine control unit connector.
- d) Remove the air intake duct and air cleaner housing (A). Tightening torque ... 8-12 N m.
5. (2009 and later models) Remove the air intake duct and air cleaner housing.

a) Remove the air intake duct (A).

b) Disconnect the ventilation hose (A), the electronic control unit connector (B), and remove the air filter housing (C).
Tightening torque..... 8-12 N m

6. Remove the front wheels.
Tightening torque... 88.5-107.5 N m

7. Remove the lower engine guard (A).
Tightening torque... 8-12 N m
- 8. Drain the coolant.
- 9. Remove the radiator hoses (A).

Models before 2009

Models from 2009
10. Remove the heater hoses (A).

Models before 2009

Models since 2009
11. (Models before 2009) Disconnect the A/C compressor switch (A), alternator connector (B), and oil pressure switch connector (C).

12. (2009 and later models) Disconnect the intake manifold throttle body VAV connector (A), oil pressure switch connector (B), knock sensor connector (C), and A/C compressor connector (D).

13. (Pre-2009 models) Disconnect the CVVT valve (A) and oil temperature sensor (B) connectors.

14. (Since 2009 models) Disconnect the CVVT valve (intake valve) connector (A). CVVT

15. (Pre-2009 models) Disconnect the injector connectors (A).

16. (2009 and later models) Disconnect the injector connectors (A) and the ignition coil connectors (B).

17. (Pre-2009 models) Disconnect the throttle actuator connector (A).

18. (2.4L models since 2009) Disconnect the throttle actuator (A) and the manifold absolute pressure (MAP) sensor connector (B).

19. (2.0L 2009 and later models) Disconnect the IAC valve (A), TP sensor (B), MAP sensor (C), and throttle cable (D) connectors.

20. (Pre-2009 models) Disconnect the knock sensor (B) and camshaft position sensor (A) connectors.

21. (Pre-2009 models) Disconnect the ignition coil connectors (A).

22. (2009 and later models) Disconnect the camshaft position sensor connector (A) and the fuel line (B).

23. (Pre-2009 models) Disconnect the PCV valve connector (A), coolant temperature sensor connector (B), condenser connector (C), and crankshaft position sensor connector (D).

24. (Pre-2009 models) Remove the fuel rail (A), brake booster vacuum hose (B), and PCV hose (C).

25. (Since 2009 models) Disconnect the PCV valve connector (A), coolant temperature sensor connector (B), condenser connector (C), crankshaft position sensor connector (D), camshaft position sensor connector propeller shaft (E) and brake booster vacuum hose (F).

26. (2009 and later models) Disconnect the generator connector (A) and terminal "B" wire (B).

27. (2009 and later models) Disconnect the starter connector (A) and wire (B).

28. (Pre-2009 models) Disconnect the power steering fluid pressure sensor connector.

29. (2009 and later models) Disconnect the power steering fluid pressure sensor connector (A) and the CVVT valve (exhaust) connector (B).

30. Disconnect the power steering pump hose (A).

31. Remove the battery tray (A).

32. Disconnect the ground wire from the transmission (A).

33. (Models with automatic transmission) Disconnect the following connectors:
- - Start inhibit switch connector;
- - Automatic transmission selector connector;
- - Input shaft speed sensor connector;
- - Output shaft speed sensor connector;
- - Vehicle speed sensor connector;
- - Selector position selector cable.
- 34. Drain the automatic transmission fluid or manual transmission oil.
- 35. Disconnect the EPS solenoid valve connector.

- 36. Disconnect the lower suspension arms.
- 37. Disconnect the tie rod ends.
- 38. Remove the stabilizer bar.
- 39. Disconnect the drive shafts.
- 40. Remove the clamp (B), disconnect the return hose (A), and drain the power steering fluid.

41. Disconnect the steering column universal joint.
Tightening torque (A) .......... 18-24 Nm

42. (Pre-2009 models) Disconnect the oxygen sensor connector (A).

- 43. (Pre-2009 models) Remove the front exhaust downpipe.
- 44. (2009 and later models) Disconnect the oxygen sensor connector (A) and remove the front exhaust pipe (B).

- 45. Install a support under the engine.
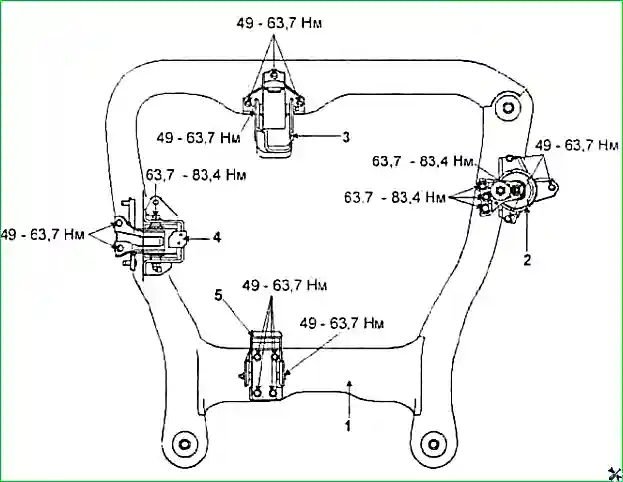
- 46. Remove the bolts from the front and rear powertrain mount brackets.
- 47. Remove the bolts from the subframe bracket (B) and remove it from the subframe (A).


48. Remove the side engine mount bracket (A).
Tightening torque: 64-83 N m

49. Remove the automatic or manual transmission support bracket (A).
Tightening torque (B) 64-83 N m

- 50. Lower the engine from the engine compartment.
- 51. Installation is performed in the reverse order Removal.
- 52. After installation, perform the following operations:
- a) Adjust the transmission control cables and accelerator pedal cable.
- b) Add engine oil, coolant, manual transmission fluid, or automatic transmission fluid (ATF).
- c) Check the condition of the battery wires and terminals.
- d) Check for fuel leaks after connecting the fuel lines. Turn the ignition on for 2 seconds (do not engage the starter) to allow the fuel pump to pressurize the fuel lines. Repeat this operation two or three times, then check for leaks in the connections.

")
")
")
")
")
")
")
")