
Before disassembling the starter, you need to check its serviceability with simple checks
Remove the starter as described in the previous article

Using a screwdriver, we check the ease of movement of the drive coupling along the shaft

Turning the drive gear.
The gear should rotate easily relative to the clutch hub in the direction of rotation of the armature and should not rotate in the opposite direction

After that, we connect the negative terminal of the battery with the starter housing with wires
We connect the second wire with one end to the plus terminal of the battery, and with the other - to the output of the control wire of the traction relay
If the traction relay is working properly, then a click is heard and the drive clutch extends. Otherwise, we replace the traction relay

Disconnect the wire from the control output of the traction relay and connect it to the lower contact bolt of the traction relay
The starter armature must rotate at a speed greater than 6000 min-1. Otherwise, you need to repair the starter
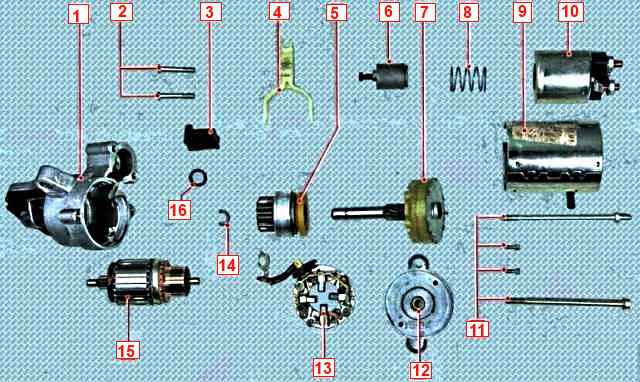
Starter disassembly

We unscrew the nut of the lower contact bolt of the traction relay and disconnect the bus from the contact bolt of the traction relay

We unscrew the three screws securing the traction relay to the starter cover from the drive side

Remove the traction relay by disconnecting the armature from the drive lever

We remove the armature and return spring from the traction relay case


We unscrew the coupling bolts and disconnect the starter housing


Unscrew the two bolts and remove the bearing cover

Remove the brush assembly

Fix the brushes with a head of a suitable size

Remove the rotor from the starter housing


Remove the rubber seal and take out the planetary gear


Pry off with a screwdriver and remove the drive lever


Remove the restrictive ring and disconnect the gear mechanism from the armature shaft


Remove the restrictive ring and cover

Remove the plastic gear from the shaft

Remove the gears from the rails

Squeeze and remove the retaining ring

Remove the seal
Inspecting the brush holder
Checking the height of the brushes in the brush holder. We check the insulated housings with an ohmmeter for a short circuit with the housing
The splines and trunnions of the armature shaft must not be damaged. The anchor collector must not have any signs of burning
Insignificant burning is eliminated with a rag soaked in gasoline and fine-grained emery cloth

Check the armature winding for a short circuit with an ohmmeter
Check whether the armature of the starter traction relay moves easily, whether the contact bolts of the contact plate close (using an ohmmeter)
Checking the drive. The teeth of the drive gear should not have significant wear.
The gear should rotate easily relative to the clutch hub in the direction of rotation of the armature and should not rotate in the opposite direction
If the gear teeth are worn or damaged, or the gear rotates in both directions, replace the drive
The starter lever must be free of cracks and signs of significant wear
Lubricate the splined surface of the armature shaft with silicon-containing grease
The drive clutch does not need to be lubricated and should not be used for cleaning agents that could wash out the grease in the clutch
Lubricate the bearings (bushings) in the starter covers with engine oil
We assemble the starter and all dismantled parts in reverse order

")
")
")
")
")
")
")
")