


Draining the refrigerant
As the air conditioning circuit is equipped with only one charging valve, some charging stations use only the high-pressure line.
In some cases, before draining the refrigerant, let the system run for a few minutes to ensure complete drainage.
When draining the refrigerant or checking the charge of the refrigeration circuit, three cases must be considered:
- Engine and air conditioning running;
- Engine running, air conditioning off;
- Engine and air conditioning off.
Engine and air conditioning running
Let the air conditioning run until the engine cooling fan has switched on twice, then stop the engine.
Perform the first refrigerant drain (measure the quantity extracted), wait 15 min.
Check that the relative pressure is less than or equal to 0 bar; if not, repeat the drain cycles.
Add up the quantities of refrigerant extracted during all cycles.
The charge is considered sufficient if the total obtained is equal to +35 g or –100 g of the nominal value.
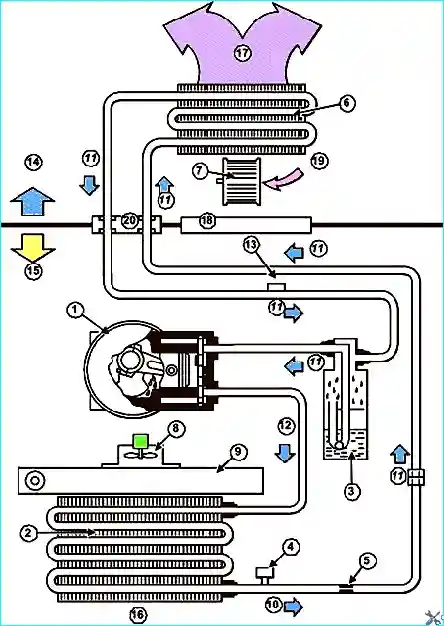
Fig. 1. Air conditioning system operation: 1 - compressor, 2 - condenser, 3 - receiver-drier, 4 - pressure sensor, 5 - expansion valve, 6 - evaporator, 7 - blower motor, 8 - engine cooling fan, 9 - engine cooling radiator, 10 - high-pressure refrigerant, 11 - low-pressure vapour, 12 - high-pressure vapour, 13 - charging valve, 14 - passenger compartment, 15 - engine compartment, 16 - outside air, 17 - to air distribution unit, 18 - bulkhead, 19 - outside or recirculated air, 20 - pipe flanges on bulkhead
Engine running, air conditioning off
Let the engine run until the cooling fan has switched on twice, then stop the engine.
Perform the first refrigerant drain (measure the quantity extracted), wait 15 min.
Run the engine until the cooling fan has switched on twice, then perform the second refrigerant drain (measure the quantity extracted).
Repeat the drain cycles if the pressure is not less than or equal to 0 bar.
Add up the quantities of refrigerant extracted during all cycles.
The charge is considered sufficient if the total obtained is equal to +35 g or –100 g of the nominal value.
Engine and air conditioning off
Perform the first refrigerant drain, wait 2 h.
Repeat the drain cycles if the pressure is not less than or equal to 0 bar.
Add up the quantities of refrigerant extracted during all cycles.
The charge is considered sufficient if the total obtained is equal to +35 g or –100 g of the nominal value.
Leak detection
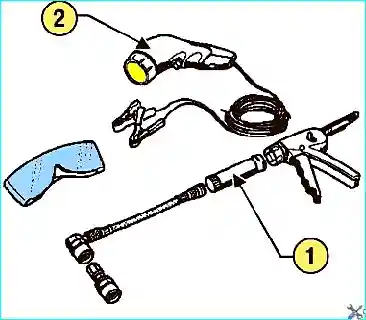
Fig. 2. Refrigerant leak detection tool: 1 – capsule; 2 – ultraviolet lamp
To locate leaks, a fluorescent dye supplied in single-use capsules is used; leak traces are detected using an ultraviolet lamp (Fig. 2).
The fluorescent dye remains in the air conditioning system. The UV lamp can be used to check the condition of the refrigeration circuit.
If characteristic fluorescent traces are present, it is forbidden to introduce fluorescent dye into the circuit.
Introduce the fluorescent dye if there are no characteristic fluorescent traces and no warning label (indicating previous use).
Introducing the fluorescent dye into the circuit.
Install the injection system on the low-pressure valve; on vehicles with a single valve, on that valve.
Inject the dye into the circuit.
Switch on the air conditioning and let it run for approximately 15 min.
Leak detection procedure
Perform an initial check (engine off) by passing the UV lamp beam over the entire refrigeration circuit.
If no leaks are found:
- thoroughly clean the external surfaces of the refrigeration circuit components;
- start the compressor and do not switch it off until the refrigerant leak is located (if unsuccessful, check the evaporator).
After using the dye, indicate the date of use on the warning label (supplied with the capsule).
The label must be affixed in a visible location near the charging valves (on the suspension strut top mount).


