
Usually, the replacement of the gasket under the cylinder head cover is required if there are oil leaks from under the cover
We also replace the gasket when it becomes necessary to repair the cylinder head.
On the K4M engine, a sealant-gasket is used instead of a gasket
You will need the tools that were used to remove the air filter and ignition module, as well as a Torx T50 key
Preparing the car for repair. Disconnect the wire from the negative terminal of the battery.
On K7J and K7M engines do the following:

Remove the air filter (described in the article - How to replace the Renault Sandero engine air filter element)

Remove the ignition module (described in the article - Replacing the elements of the Renault Sandero ignition system)

Remove the adsorber purge hose from the holder on the cylinder head cover

Disconnect the hose of the large branch of the crankcase ventilation system from the fittings of the cylinder head cover

Disconnect the hose of the small branch of the crankcase ventilation system

We unscrew the eight screws securing the cover

Remove the head cover

Removing the gasket
We clean the grooves of the cover and the surface of the block head from the remnants of the old gasket

Installing a new gasket and head cover.
We tighten the head cover bolts according to the order shown in the photo in two stages:
- - the first stage - pre-tightening with a torque of 2 Nm;
- - the second stage - the final tightening with a torque of 10 Nm.
Replacing the seal of the cylinder head cover of the K4M engine
We prepare the car and disconnect the negative battery terminal
Remove the air filter
Disconnect the wiring harness from the intake air temperature sensor on the receiver
Remove the ignition coils (described in the article - Replacing the elements of the ignition system of a Renault Sandero car)
Removing the receiver
Remove the oil separator
Remove the right suspension support of the power plant
Remove the top cover of the timing belt (described in the article - How to set the TDC of a Renault Sandero engine)
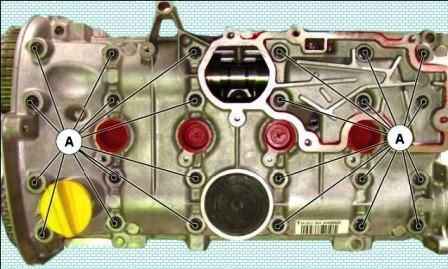
We unscrew the twenty-four head cover bolts

We unscrew the bolts in the reverse order shown in the photo

We pry off the cylinder head cover with a mounting spatula

Remove the cylinder head cover

We clean the mating surfaces of the cover and cylinder head from the old sealant.
We degrease the mating surfaces of the cylinder head, oil separator and cylinder head cover with white spirit
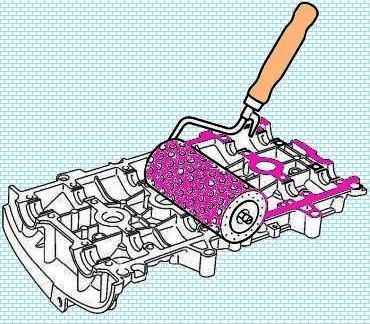
We apply a sealant to the mating surface of the cylinder head (you can use a roller for painting). Sealant Mastixo or similar
Install the cover on the cylinder head
Tighten the cover bolts in four steps. The tightening sequence is shown in Figure 2
- - the first stage - we tighten the bolts 22, 23, 20, 13 with a torque of 8 Nm
- - the second stage - we tighten the bolts from the first to the twelfth, from 14 to 19, from 21 to 24 with a torque of 12 Nm;
- - the third stage - loosen the bolts 22, 23, 20, 13;
- - the fourth stage - we tighten the bolts 22, 23, 20, 13 with a torque of 12 Nm.
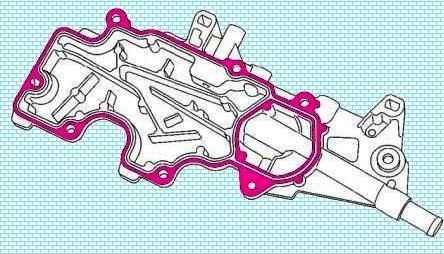
Apply Mas-Tixo to the oil separator with a paint roller
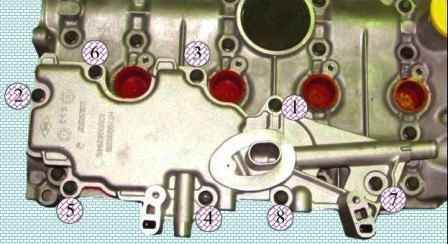
Install the oil separator and tighten the bolts in the order shown in the figure to a torque of 15 Nm
Install the parts in reverse order.

")
")
")
")
")
")
")
")