
We check the belt of auxiliary units at each technical inspection, as well as in the event of a malfunction associated with possible damage or low belt tension.
To check the belt, remove the right front wheel
We remove the right engine mudguard (see the article - How to remove the protection and mudguards of the Renault Sandero engine)
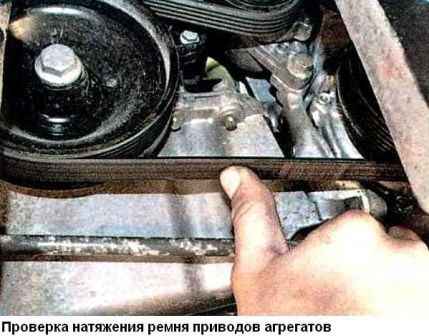
Check the belt tension by pressing on the belt branch with your thumb and determining the deflection with a ruler.
If the distance between the centers of the pulleys is from 180 to 280 mm, the deflection should be approximately 6 mm.
If the belt is not tensioned, then, depending on the equipment, it is necessary to adjust the belt tension or replace the automatic tensioner.
Auxiliary belt replacement
In accordance with the maintenance regulations, we replace the auxiliary drive belt on a car equipped only with power steering every 60 thousand kilometers or after 4 years (whichever comes first), regardless of its condition, on other cars - after 120 thousand km or in 6 years.
We perform work on a viewing ditch or overpass.
Depending on the vehicle configuration, there are such options for auxiliary drive schemes:
- - with power steering and air conditioning;
- - with power steering, without air conditioning;
- - without power steering and air conditioning;
- - without power steering with air conditioning
We recommend checking the condition of the belt at every maintenance.
The belt must be replaced if cracks, tears and delamination of rubber from the fabric base are found on it.
Option 1 (with power steering and air conditioning)
The belt tension of a car with power steering and air conditioning is adjusted automatically by the tensioner.
To replace the belt, remove the right mudguard of the engine compartment.

To loosen the belt tension, from the bottom of the car we put a spanner wrench or a 1Z head on the tension roller mounting bolt and turn the roller bracket clockwise, overcoming the spring force of the tensioner, until the hole in the roller bracket and the recess in the device body are aligned (for clarity shown with removed engine).

We fix the roller bracket by inserting a hexagon 6 or a rod with a diameter of 6 mm into its hole and a recess in the body of the tensioner.
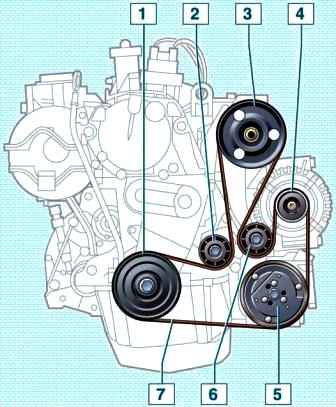
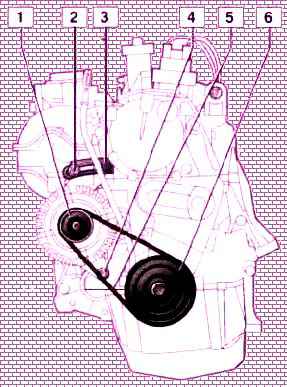
Scheme of the drive of auxiliary units of a car with power steering and air conditioning

Remove the accessory drive belt
Marking of the drive belt for auxiliary units of a car with power steering and air conditioning - 5K 1747 (five-wedge, 1747 mm long).
When replacing the belt, the idler and idler must also be replaced.

To replace the support roller with a ring wrench or a 1Z head, unscrew its fastening bolt

Remove the bolt with the protective cover of the roller

Remove the support roller. We also remove the tension roller.

To replace the tensioner, with a head of 13, unscrew the two bolts securing the tensioner housing and remove the tensioner assembly with the roller.
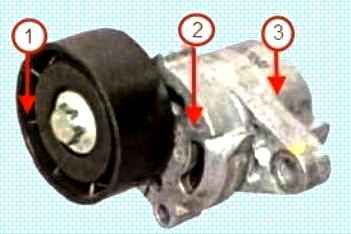
Automatic tensioner assembly.
Install the removed parts in reverse order.
Before mounting the belt, the idler pulley bracket must be turned clockwise and locked.

We lay the belt on the pulleys so that it is shifted to their outer edge 1, and the inner stream of the pulleys 2 remains free.
When installing the belt, we lay it on the pulleys and wind it under the tension and support rollers in accordance with the drive diagram.
The drives of auxiliary units, the generator, the air conditioning compressor and the power steering pump are six-stranded, and the drive belt is five-wedge.
After installing the belt, slightly turning the tension roller with a wrench, remove the latch.
Then, with an 18 head with a ratchet, turn the crankshaft clockwise three turns for the bolt securing its pulley to achieve the correct position of the belt.
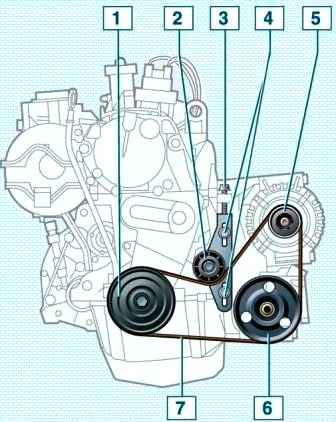
Option 2 (with power steering, without air conditioning)
Checking the tension of the belt of auxiliary units of a car with power steering and without air conditioning, the manufacturer recommends using a special tool (tensometric tester).
Given that the belt may need to be changed on the way (for example, if it breaks), away from the service, we will show a method in which you can approximately estimate the belt tension.
Excessive belt tension leads to premature failure of the belt and idler, as well as accessory bearings.
Remove the right mudguard of the engine compartment.
From the bottom of the car with your thumb, press the belt in the middle between the pulleys of the power steering pump and the crankshaft.
With a pressing force of -10 kgf, the deflection of the belt should be 6-8 mm.
To tension the belt, loosen the two bolts 4 fastening the tension roller bracket and turn the adjusting bolt 3 clockwise.
Having tightened the belt, we tighten the bolts of the tension roller.
To replace the belt, loosen the bolts 4 fastening the tension roller bracket and turn the adjusting bolt 3 counterclockwise a few turns.
Release the tension of the belt, remove it from the pulleys.
Marking of the drive belt for auxiliary units of a car with power steering and without air conditioning - 5K 1110 (five-wedge, 1110 mm long).
When replacing a belt, the tensioner pulley must also be replaced.
Install the accessory drive belt in reverse order.
The pulleys for the drive of auxiliary units, the generator and the power steering pump are six-stranded, and the drive belt is five-wedge.

We lay the belt on the pulleys so that it is shifted to the inner edge of the 1 pulleys, and the outer stream of the pulleys 2 remains free.
Adjust the tension of the belt.
Option 3 (without power steering and air conditioning)
To check the tension of the alternator drive belt on a car without power steering and without air conditioning, press the belt with your thumb in the middle between the alternator and crankshaft pulleys.

With a pressing force of -10 kgf, the deflection of the belt should be 6-8 mm.
To tension the belt, remove the right mudguard of the engine compartment (How to remove the protection and mudguards of the Renault Sandero engine).
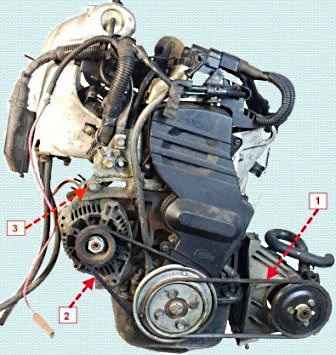
Weaken bolt 4 of the lower fastening of the generator and bolt 2 of fastening the generator to the tension bar.
Moving the generator away from the engine block with a mounting blade, we tighten the belt.
Tightening the generator mounting bolts.
When replacing the belt, loosen its tension and remove the belt from the crankshaft and generator pulleys.
The marking of the alternator drive belt on a car without power steering and without air conditioning is 4RK 718 (four-wedge, 718 mm long).
Install the alternator drive belt in reverse order and adjust its tension.
Option 4 (without power steering with air conditioning)
On vehicles where the alternator and air conditioning compressor are located on opposite sides of the engine, replace the drive belts in the following order.
Remove the A/C compressor drive belt 1 by cutting it.
Replace the alternator drive belt, to do this:
Loosen the bolt 3 fastening the generator to the tension bar
Loosen the bolt securing the generator to the bracket and remove the belt from the drive pulleys
Install a new belt and adjust its tension.
When you press your finger on the belt between the pulleys of the generator and the crankshaft with a force of 100 N (10 kgf), the belt deflection should be 8-10 mm.
We tighten the bolt of fastening to the tension bar with a torque of 21 Nm (2.1 kgf.m)
We tighten the bolt of the generator to the bracket with a torque of 44 Nm (4.4 kgf.m)
Install the air conditioning compressor drive belt, for this:
Install the belt holder (supplied with the A/C compressor drive belt) at the bottom of the crankshaft pulley.
Put the belt on the A/C compressor pulley and slide it behind the holder that was installed on the crankshaft pulley.
Slide the belt holder with the belt attached to it clockwise along the crankshaft pulley as far as hand pressure allows.
Install a special hook (included in the delivery of the air conditioning compressor drive belt): with one side it clings to the compressor mounting bracket, and the other (more bent) - to the belt.
The hook is installed so that the upper branch of the belt does not come off the air conditioning compressor pulley.
Rotate the crankshaft so that the belt fits over its pulley.
Remove the belt holder and hook. These devices are disposable, after use they can be thrown away.
Turn the crankshaft two turns to get the A/C compressor drive belt in the correct position on the pulleys.

")
")
")
")
")
")
")
")