We remove the automatic transmission for repair, as well as for replacement.
Main defects that require automatic transmission removal:
- - leakage of working fluid through seals and gaskets;
- - difficult gear shifting;
- - increased noise;
- - spontaneous switching off or fuzzy switching on of gears.
We also remove the gearbox to replace the rear oil seal of the engine crankshaft.
It is advisable to remove the gearbox together with an assistant, as the gearbox is heavy.
In practice, the work of removing the gearbox is similar to removing the manual transmission (described in the article - Removing and installing manual transmission Renault Duster), but with the following differences.
The automatic transmission is controlled using one cable, and not two as in a mechanical box.

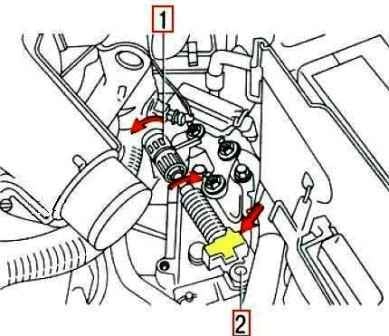
To disconnect from the gearbox, remove the tip 2 of the cable from the ball pin of the multifunction switch lever, overcoming the resistance of the latch.
Turn the coupling halves 1 in the directions shown by the arrows in the figure.
Remove the clutch from the bracket on the gearbox and move the cable to the side.
There is a yellow plastic distance ring between the coupling halves.
Do not remove this ring.
If it breaks, the clutch can be installed without it - this will not affect the performance of the drive.

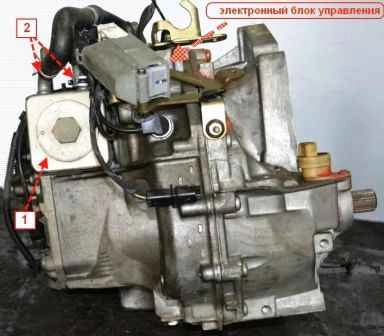
A heat exchanger 1 is installed on the gearbox, a figure used to cool the oil in the automatic transmission.
The hoses of the engine cooling system are attached to its fittings.
Before removing the automatic transmission, drain the coolant (article - Checking and replacing the engine coolant Renault Duster).
Disconnect the heat exchanger hoses 2.
Disconnect the harness block from the electronic transmission unit by pulling out its lock.
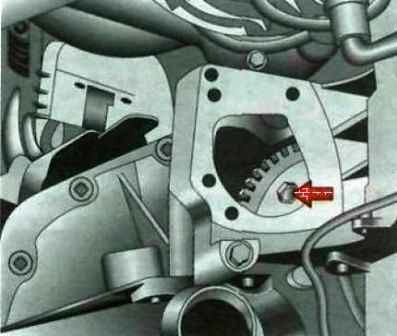
Remove the engine starter.

Through the window that opens after removing the starter, unscrew the three nuts securing the torque converter to the drive disk, turning the crankshaft for access to them by the bolt securing the auxiliary drive pulley and holding the disk from turning with a mounting blade.
Do not reuse torque converter mounting nuts.
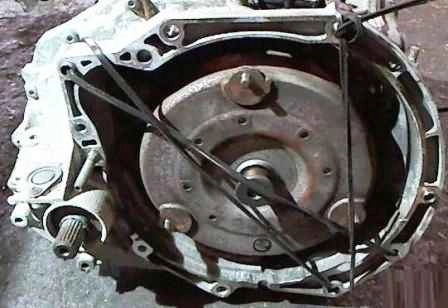
The torque converter is not fixed in any way against longitudinal displacement on the planetary gear shaft, therefore, when removing the gearbox, be careful not to let the transformer jump off the shaft.

After removing the gearbox, we tie the torque converter to the gearbox with wire or in another way.
Install the automatic transmission in reverse order.


