


Maintenance intervals
Daily maintenance procedures
- Air intake duct — check.
- Coolant level — check.
- Crankcase breather pipe — check.
- Drive belts — check.
- Cooling system fan — check.
- Fuel water separator — drain sediment.
- Engine oil level — check.
- Fluid level for diesel engine exhaust systems — check.
Maintenance procedures every 10,000 km [6,000 miles], 250 engine hours or 3 months
- Hydraulic pump drive — check.
- Alternator — check.
- Air conditioning compressor — check.
- Air filter restriction — check.
- Charge-air cooler — check.
Maintenance procedures every 20,000 km [12,500 miles], 500 engine hours or 6 months
- Oil and oil filter — replace.
- Fuel filter — replace.
- Cooling system — check.
- Radiator cap — check.
Maintenance procedures every 40,000 km [25,000 miles], 1,000 hours or 1 year
- Fan belt tensioner — check.
- Belt-driven fan hub — check.
Maintenance procedures every 80,000 km [50,000 miles], 2,000 engine hours or 2 years
- Cooling system — flush.
- Radiator hoses — check.
- Crankshaft pulley / torsional vibration damper — check.
Maintenance procedures every 160,000 km [100,000 miles], 4,000 engine hours or 4 years
- Valve train — adjust.
- Diesel exhaust fluid dosing module — replace.
Engine oil selection
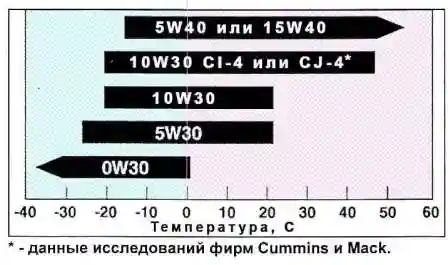
The engine oil is selected based on the vehicle operating temperature range and the vehicle manufacturer’s instructions.
Make sure that the selected oil with the appropriate viscosity (per SAE) also meets the quality requirements (API, ACEA or JACO).
The engine oil viscosity is selected based on the vehicle manufacturer’s recommendations and the vehicle operating temperature range.
Cummins recommends:
- at operating temperatures above 15 °C, use a high-quality all-season engine oil SAE 15W-40.
For operation at lower temperatures, engine oils of SAE 10W-30 viscosity and CES 20078 (API CI-4) or CES 20081 (API CJ-4) quality may be used.
According to the test results of Cummins and Mack, the above engine oils can be used over a wider temperature range than 10W-30 oil meeting the previous API requirements.
Since these oils are designed to operate under a thinner oil film than 15W-40 oils, at temperatures above 20 °C use high-quality Fleetguard filters, Valvoline Premium Blue, Valvoline Premium Blue Extreme Life or equivalent engine oils, as well as Fleetguard or equivalent oil filters.
Use oil of a class per CES, API, ACEA, etc. not lower than that specified by the vehicle manufacturer.
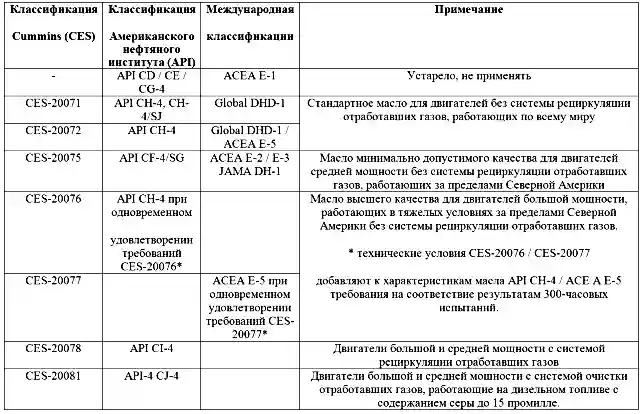
Caution! The use of CES-20081 oil in off-road vehicle engines running on high-sulphur fuel may cause serious damage to the fuel equipment and the engine unless the engine oil change intervals are strictly observed.
It is not recommended to mix oils made on different bases (for example, synthetic with mineral). The result of mixing may be the precipitation of additives.
It is undesirable to mix oils from different manufacturers, since each manufacturer uses its own additive package which may react and degrade the oil properties.
It is not recommended to add any additives to the engine oil, as this may damage the mechanical part of the engine.
When purchasing engine oil, it is also necessary to check the oil expiry date. The oil shelf life is regulated and, as a rule, the oil packaging date is indicated on the container.
Checking the engine oil level
Before carrying out this check, place the vehicle on a flat horizontal surface.
Carry out the check with the engine stopped. If the engine is running, stop it and wait some time before starting the check.
Place the vehicle on a flat horizontal surface. After switching off the engine, wait a few minutes for the oil to drain into the sump.
Withdraw the oil dipstick and wipe the oil off the dipstick with a clean cloth. Insert the oil dipstick fully into the dipstick guide. Slowly withdraw the oil dipstick and check that the oil level corresponds to the specified range.
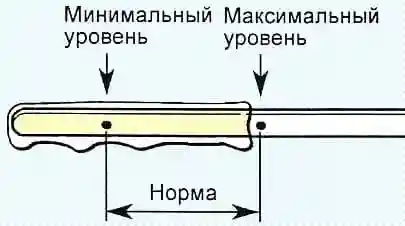
If the oil level is below the minimum, top up with the recommended engine oil.
Note: the volume of oil added to the engine sump from the lower level mark to the upper level mark is 1 litre.
Caution! Filling engine oil above the maximum level adversely affects engine operation.
Start the engine, set idle speed and then stop it. Wait some time and check the oil level again to make sure that the level is within the specified range.
It is necessary to make sure that the oil has sufficient viscosity, as well as to check for the absence of coolant and fuel impurities in the oil and the degree of oil contamination.
Replacing the engine oil and filter
When replacing the engine oil, it is recommended to replace the oil filter as well.
The oil change interval depends on its quality and operating conditions. When using oil of the recommended class (CES-20072, CES-20077, CES-20078), the oil and filter must be changed every 20,000 km. When using oil of a class lower than recommended — every 10,000 km.
Place the vehicle on a flat horizontal surface. Warm up the engine to 60 °C and stop it.
Remove the oil filler cap and unscrew the oil sump drain plug.
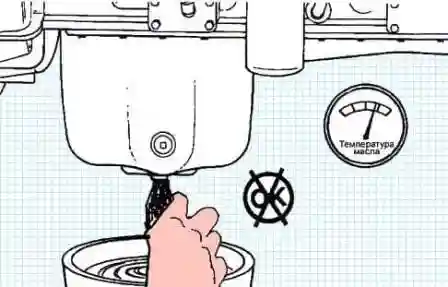
Drain the oil into a suitable container.
Caution! Be careful as the oil is hot.
Remove the oil filter.
- Remove dirt around the oil filter.
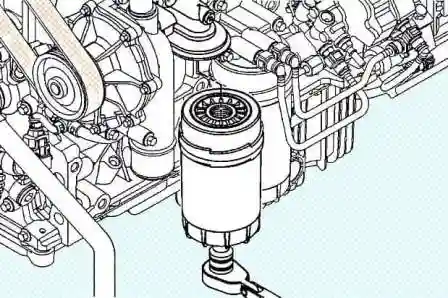
- Unscrew the oil filter using a puller or a wrench.
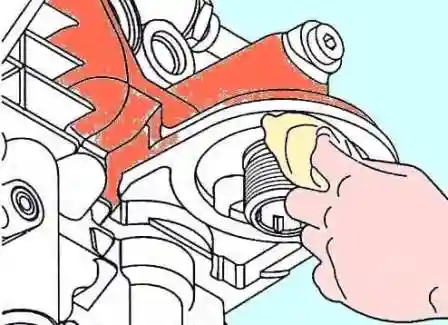
- Clean the mating surface under the oil filter.
Install the oil filter.
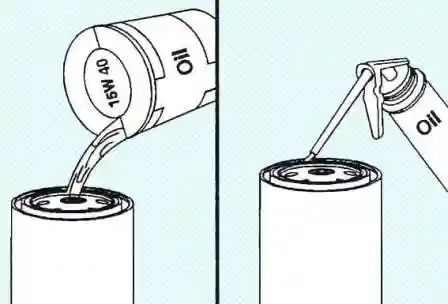
- a) Lightly lubricate the O-ring with oil.
- b) Fill the filter with clean oil.
Caution! The lack of lubrication due to the delay caused by filling the filter with oil may damage the engine.
Note: do not allow foreign particles to enter the filter. When using oil from a can sealed with metal or plastic film, carefully separate the film. If it is pierced with a knife or a sharp object, foreign particles may enter the can.
- c) Screw the filter onto its seat by hand until the gasket contacts the mating surface.
- d) Using a puller, tighten the filter a further 3/4 to 1 turn.
Install the drain plug with a new sealing ring.
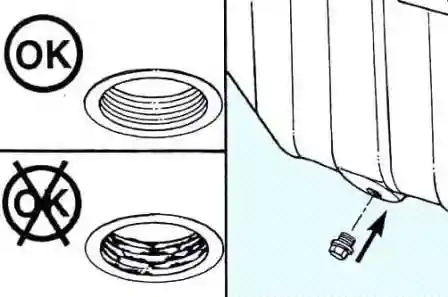
Tightening torque: 20 N·m.
Fill with new engine oil.
Fill capacity:
- in the oil sump: about 10.5 l;
- total capacity: 13.1 l.
Note: the engine oil volume may vary considerably depending on the engine modification.
Start the engine. Make sure there are no leaks.
Stop the engine, wait about 5 minutes and check the engine oil level with the dipstick.
Coolant
Make sure that the coolant level in the expansion tank with a cold engine is between the “MAX” and “MIN” (or “ADD”) marks on the tank surface.
If the coolant level is low, make sure there are no leaks and add coolant up to the “MAX” mark (warm engine) or the “MIN” mark (cold engine).
Caution! Do not add cold coolant to a hot engine. This may damage the cast parts of the engine. Before adding, let the engine cool to a temperature below 50 °C.
Remove the radiator cap.
Caution! To avoid burns, do not remove the radiator cap on a hot engine, as the fluid and steam are under pressure.
Make sure there are no rust deposits around the radiator cap valves and the radiator filler neck seats.
Make sure that the coolant is clear and does not contain oil.
If the coolant is dirty, clean the cooling system passages and replace the fluid.
Refit the radiator cap.
Replacing the coolant
- Remove the radiator / expansion tank cap.
- Drain the coolant:
- a) drain the coolant from the radiator by unscrewing the drain plug;
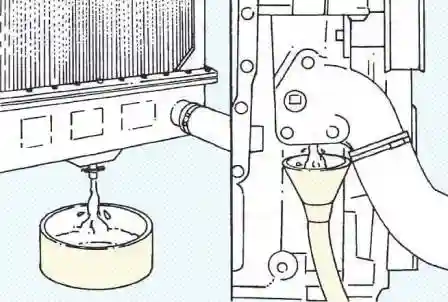
- b) drain the coolant from the engine by unscrewing the drain plug of the coolant inlet connection.
Note: prepare a container with a capacity of more than 20 l to collect the coolant.
- c) drain the coolant from the expansion tank.
Flush the cooling system if necessary. Fill the cooling system so that the system is not air-locked.
After filling, wait 2–3 minutes until the air escapes, then top up the fluid to the upper level.
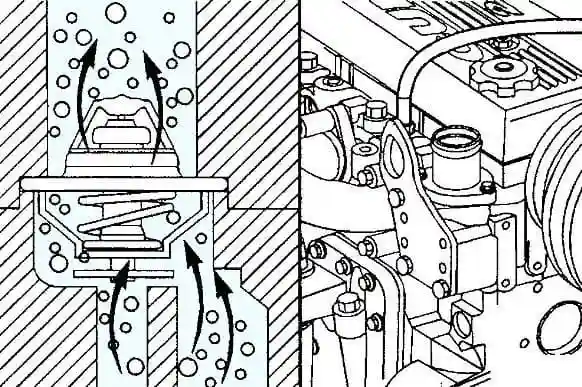
The following systems are intended for air removal:
- the thermostat is equipped with a valve that allows air to be removed when the thermostat is closed;
- the air outlet hole is connected to the expansion tank.
This hole ensures normal ventilation when filling the system at a rate of 19 l per minute.
To clean the cooling system, use an aqueous solution of soda ash, Restore or a similar product.
Restore, used to clean the cooling system of engines operating in harsh conditions, removes corrosion products, silicate gel and other deposits. The effectiveness of Restore depends on the treatment time, temperature and concentration levels. Thus, a large amount of scale or partial clogging of the system may require an increase in the detergent concentration level, temperature and flushing time, or the use of Restore Plus. A Restore concentration level exceeding the recommended one by no more than 2 times is considered safe. Be sure to use Restore Plus only at the recommended concentration.
With a large amount of scale or severe clogging of the system, it may be necessary to flush it several times.
- Pour the cleaning product into the cooling system.
Caution! Do not install the radiator cap. During this operation the engine must run without the radiator cap.
- Warm up the engine and let it run for 5 minutes at a coolant temperature above 80 °C.
- Switch off the engine and drain the flushing fluid from the cooling system.
- Pour clean water into the cooling system.
Caution! Do not install the radiator cap.
Note: before starting the engine, make sure that the manual air bleed valve installed in the coolant drain circuit of the exhaust gas recirculation system cooler is closed.
- Start the engine and let it run for 5 minutes at a coolant temperature above 80 °C.
- Switch off the engine and drain the coolant from the cooling system.
Note: if the drained water is still dirty, be sure to flush the system until it becomes clean.
Fill with coolant.
Caution! It is strictly forbidden to use pure water as coolant. This may cause engine damage from corrosion.
To fill the cooling system, use a mixture of equal parts of water and antifreeze based on ethylene glycol or propylene glycol.
- Pour in the coolant in the amount specified in the vehicle operating manual.
Fill capacity: about 15 l.
Recommended coolant:
- GAZ vehicles: “Cool Stream Premium”, “Shell Glycoshell, Diluted”, “ES Compteat”;
- PAZ buses: “Cool Stream Standart 40”, “Fleet Charge 50/50”.
- Install the filler cap.
- Warm up the engine to 80 °C and check for coolant leaks.
- Check the coolant level again to make sure that the system is filled with coolant or that its level has risen to the maximum level in the system expansion tank (if fitted).
Removing water from the coarse fuel filter
Note: drain water from the fuel filter regularly without waiting for the indicator to come on.
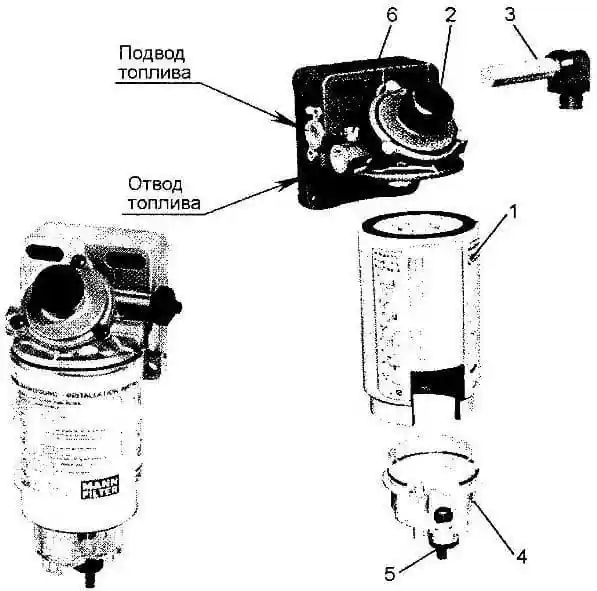
- Stop the engine.
- Unscrew the plug (5) located in the lower part of the water separator. Drain the water until fuel appears.
- If more than 50 g of fuel is drained, prime the fuel system using the manual priming pump.
- a) Unscrew the plug (6) 2–3 turns.
- b) Prime the fuel system using the manual priming pump (2) until fuel appears without air bubbles.
- c) Screw in the plug (6). Tightening torque: 6 N·m.
Fuel filter
- Disconnect the connector from the water presence sensor.
- Loosen and remove the fuel filter.
- Make sure that the O-ring has not stuck to the fuel filter head. Remove the O-ring if necessary.
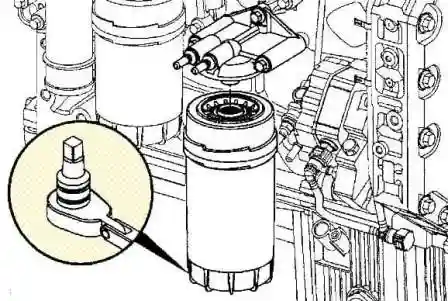
- Lubricate the O-ring with clean oil.
- Install the fuel filter on the filter head.
- Screw the filter in until it contacts the head.
- Using a puller, tighten the filter 3/4 of a turn. Tightening torque: 23 N·m.
Note: do not pre-fill the fuel filter with fuel.
- Prime the low-pressure fuel system using the hand pump (140–150 strokes for a dry filter).
- Start the engine.
- If the engine does not start within 30 s, switch off the ignition.
- Operate the priming pump again, repeating the operations described above until the engine starts.
If the engine starts, its operation may be unstable and noisy for the first few minutes, which is not a fault.


