
To prevent a sudden failure of the car's brake system, it is necessary to check the tightness of the parts of the brake system and the serviceability of the brake mechanisms at each technical inspection.
All rubber parts, regardless of their condition, must be replaced after 100,000 km or after 5 years of vehicle operation.
Brake fluid should be changed after 90 km or after 6 years of operation according to the recommendations of the factory.
But it is advisable to change the brake fluid after 2 years of operation.
Inspection of the part of the hydraulic drive working under pressure should be carried out with an assistant.
He should press the brake pedal four or five times and keep it pressed while the hydraulic drive is inspected.
If there is a leak in the connections, tighten the clamps, plugs, nuts.
Replace hoses and pipelines with mechanical damage.
If the slave cylinders are leaking, repair or replace them.
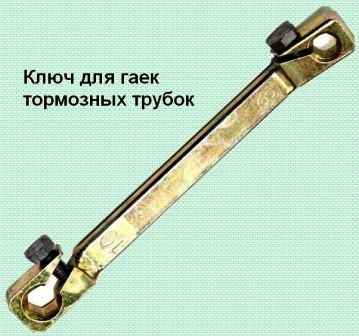
Special pipe nut wrenches or 8, 11, 14 wrenches will be required.

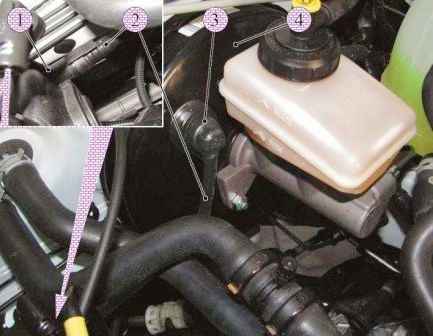
Inspecting the reservoir of the master brake cylinder

Inspecting the pipeline connections

Check for fluid leaks from the connections of the brake pipes with hoses.

Inspecting the brake hoses.
Hose should not have cracks, tears or abrasions.
When you press the brake pedal, there should be no swelling on the hose.

Inspecting the connections of the hoses with the working cylinders and the valve for releasing the air of the brake mechanisms of the front wheels

Inspecting the connections of the hoses with the working cylinders and the valve for releasing the air of the brake mechanisms of the rear wheels

Checking the fastening of pipelines in holders.
Loose or broken holders lead to vibration and, as a result, to breakage of pipelines.

We check the condition of pipelines and hoses, as well as their connections on the rear suspension beam, the fastening of pipelines to the car body and to the rear suspension beam, the connection of pipelines with the brake force regulator in the rear brake hydraulic drive.
Checking and adjusting the brake pedal
By the position of the brake pedal, you can judge the health of the brake system.
If the pedal is at a distance greater than the standard distance from the floor, the wheels may not completely release when the pedal is released.
If the pedal is set too low, there may be reduced brake performance due to reduced pedal travel.
You will need tools: a ruler, pliers, a 13 key.

We press the brake pedal all the way and measure the distance from the pedal pad to the floor
(the ruler must be set perpendicular to the floor plane)
Release the pedal and re-measure the distance from the pedal pad to the floor in the free state.
This distance should be 100-105 mm.
The difference in size between two measurements is the full stroke of the pedal, which should be 60-65 mm.

If the distance does not correspond to the specified intervals, adjust it by changing the length of the pusher of the vacuum brake booster.
Disconnect the pushrod plug from the brake pedal

Loosen the tightening of the locknut "B" of the fork.
And holding the pusher "B" from turning, rotate the fork "A" in the right direction.
One turn of the fork changes the position of the brake pedal by approximately 5 mm.
Check the free play of the brake pedal, to do this, move the pedal by hand until the pedal stops moving without resistance.
We determine the free play by the ruler, which should be 8-10 mm.
Mismatch of the specified free play can be caused by:
- increased backlash in the connection of the pusher fork of the vacuum booster and the pedal.
This may be due to wear on the fork pin in the hole in the fork and pedal;
- the distance from the pedal pad to the floor in the free state is incorrectly adjusted;
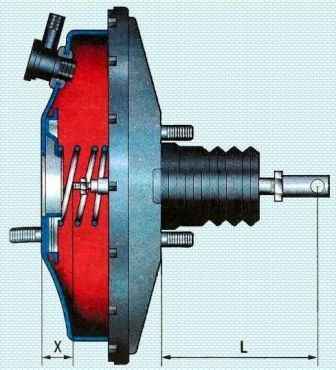
- the dimension “X” between the end of the adjusting bolt of the brake booster rod and the flange of its body for connecting the master brake cylinder is incorrectly adjusted.
If the pedal stroke is more than 8-10 mm, then this indicates the presence of air in the hydraulic brake drive or the wear limit of the brake pads, brake discs or drums. Bleed the air from the hydraulic drive or replace the pads, discs or brake drums.
If the pedal is pressed all the way down and held in this position, the pedal gradually moves to the floor, this indicates a fluid leak from the hydraulic drive or a malfunction of the brake master cylinder.
Checking the operation of the vacuum brake booster
If the vacuum is faulty, the force on the brake pedal increases.
To check the vacuum booster, you will need a rubber bulb and a screwdriver.

With the engine off, press the brake pedal five or six times.
Holding the brake pedal down, start the engine.
The brake pedal should move forward.
If this does not happen, check the tightness of the vacuum hose tip on the inlet pipe fitting and the tightness of the vacuum hose check valve fitting in the vacuum booster housing
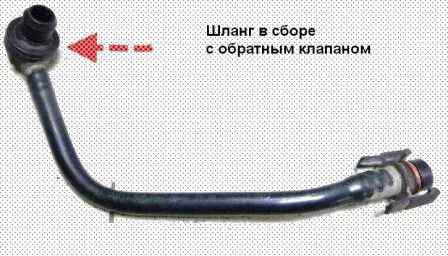
To check the check valve, remove the vacuum hose assembly, for which:

- compress the retainer and disconnect the vacuum hose from the inlet pipe fitting;

- use a screwdriver to remove the check valve fitting from the vacuum booster housing;

- remove the hose assembly with the check valve.
We put on the check valve fitting, with which the valve is inserted into the amplifier, a rubber pear and compress it. The air must escape through the valve.
Releasing the pear. If it remains in a compressed state, then the valve is working.
Otherwise, replace the check valve. In the absence of a pear, you can blow the valve with your mouth.
Install the parts in reverse order.
Checking the wear of brake pads and drums
You will need a caliper or ruler
We install the car on a lift or a viewing ditch
Remove the front wheel

Check through the hole in the brake caliper housing the condition of the linings of the pads.
If the thickness of the pads together with the base is less than the allowable value indicated in the table, we replace the pads.
Dimensions of brake pads, discs and drums
Car with K7J engine
Front brakes:
- Brake disc diameter 238mm
- Brake disc thickness 12 mm
- Maximum allowable brake disc runout 0.07mm
- Minimum allowable brake disc thickness 10.6mm
- Brake lining thickness including base 18mm
- Minimum allowable brake pad friction thickness including base 6 mm
Rear brakes
- Diameter of the working surface of the brake drum 180.25 mm
- Maximum allowable diameter of the working surface of the brake drum 181.25 mm
- Minimum allowable brake pad friction thickness including base 3.5mm
Car with K7M engine
Front brakes:
- Brake disc diameter 259 mm
- Brake disc thickness 12 mm
- Maximum allowable brake disc runout 0.07mm
- Minimum allowable brake disc thickness 10.6mm
- Brake lining thickness including base 18mm
- Minimum allowable brake pad friction thickness including base 6 mm
Rear brakes
- Diameter of the working surface of the brake drum 180.25 mm
- Maximum allowable diameter of the working surface of the brake drum 204.45 mm
- Minimum allowable brake pad friction thickness including base 3.5mm
Car with K4M engine
Front brakes:
- Brake disc diameter 259 mm
- Brake disc thickness 20.7mm
- Maximum allowable brake disc runout 0.07mm
- Minimum allowable brake disc thickness 17.7mm
- Brake lining thickness including base 18mm
- Minimum allowable brake pad friction thickness including base 6 mm
Rear brakes
Diameter of the working surface of the brake drum 203.3 mm
The maximum allowable diameter of the working surface of the brake drum is 204.45 mm
Minimum admissible thickness of the brake pad friction lining, including base 3.5 mm
Measure the thickness of the brake disc

If its thickness is less than the allowable value, replace the brake disc

Ventilated brake discs fitted with K4M engine
To check the wear of the rear brake pads, remove the rear wheel and brake drum.
We measure the thickness of the lining along with the base. If the thickness is less than acceptable, we replace the pads.
We measure the diameter of the working surface of the brake drum. If the diameter is larger than the allowable one, we replace the drum.
Check parking brake
The handbrake should keep the car on a slope of 25% when moving the lever in the car interior by 5-7 teeth of the ratchet.

We find a flyover or loading ramp with a height of H = 1.25 m with an entrance length of L = 5 m.
This ratio corresponds to a slope of 25%
If there is no such overpass, we install the car on a flat area.
Set the gearshift lever to the neutral position, fully raise the parking brake lever.
We get out of the car and try to move it.
If you succeeded, it is urgent to adjust or repair the parking brake.

")
")
")
")
")
")
")
")