
In case of insufficient compression or other defects in the piston group, it is possible to replace the rings or connecting rods without performing an overhaul of the engine
To complete the task, you need to remove the engine from the car
It is best to remove the engine along with the gearbox, it will be much easier
After removing the engine, remove the cylinder head, described in the article - How to replace the cylinder head gasket on a Hyundai Solaris engine
Removing the oil pan, in the article - Removing the Hyundai Solaris engine oil pan
Removing the oil sump, described in the article - Removing and installing oil sump of the Hyundai Solaris engine
Turn the crankshaft so that the piston to be removed is at bottom dead center

Unscrew the two connecting rod cap bolts

Remove the connecting rod cover
If it is difficult to remove the cover, you need to move it with light blows of a hammer
The caps are machined complete with the connecting rod, so they are not interchangeable.
The cylinder number is stamped on the side of the cover.

You need to mark the connecting rod and the cover with the cylinder number so as not to be confused.

Remove the liners from the connecting rod and from its cover.
If the liners remain on the crankshaft, remove them from the shaft.
If you do not intend to replace the liners, when removing them, you need to mark them on the non-working surface.

If you need to replace the rings, remove the rings with a special puller. If it is not there, remove the rings from the piston, carefully spreading their locks.
We press the piston pin out of the upper head of the connecting rod and remove the piston from the connecting rod
We mark the parts if the parts are not damaged and they can still be used.
Inspection and Troubleshooting of ShPG Parts
After disassembly, we clean and wash all the parts of the connecting rod and piston group and the cylinder block
We clean the oil drain holes in the pistons and the oil channel in the connecting rods with wire

Check the gaps between the oil scraper, compression rings and grooves on the piston
The nominal gap for compression rings is 0.03-0.07 mm, the maximum allowable is 0.1 mm
Nominal clearance for oil scraper ring 0.06-0.15 mm
We measure the gap in the locks of the rings by inserting the ring into the cylinder in which it will work

We advance the piston like a mandrel into the cylinder so that it fits into the cylinder evenly, without distortions and remove the piston

We measure the gap in the lock of the ring with a probe
Nominal / maximum permissible gap in the lock mm:
- 0.14-0.28/0.8 - top compression ring;
- 0.30-0.45/0.8 - lower compression ring;
- 0.20-0.70/1.0 - oil scraper
If the gap for the first compression ring is less than 0.3 mm, for the second one it is less than 0.50, and for the oil scraper ring it is less than 0.8 mm, you need to carefully grind off the ends of the ring with a file.
Using an inside gauge, we measure the cylinder diameter in two mutually perpendicular planes and in three belts at a distance of 12 mm from the upper mating surface of the cylinder block, the middle and lower parts of the cylinder.
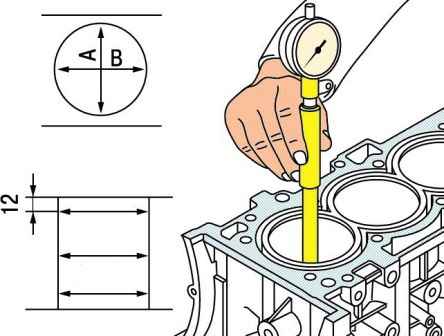
The ovality should not exceed 0.15 mm, and the taper should not exceed 0.1 mm.
If the maximum wear value is greater than 0.15 mm or the ovality and taper exceed the specified values, then the cylinder block is replaced
Checking the plane of the surface of the cylinder block

Apply the ruler with an edge to the surface in the middle of the block and the longitudinal and transverse directions

Apply a ruler along the diagonals of the plane
In each position, we measure the gap between the ruler and the surface with a probe.
If the deviation is greater than 0.05 mm, replace the block.
When replacing parts of the connecting rod and piston group, it is necessary to select pistons for cylinders by class and one group by weight, as well as piston pins for pistons by class and connecting rods by weight.

The piston class is marked on its upper part, and the cylinder class on the right wall of the cylinder block between the 2nd and 3rd cylinders.
The piston pin should easily enter the piston with the force of the thumb
Insert the finger into the piston.
If play is felt when shaking the finger, replace the piston.
When replacing a piston, match it with a finger according to the class.
Replace the connecting rods found in:
- - connecting rod deformation;
- - scuffs and deep scratches in the bushing of the upper head of the connecting rod;
- - connecting rod bearings turned in the lower head of the connecting rod

Inspecting the liners.
If there are marks, scuffs and delamination of the anti-friction layer on their working surface, replace the liners with new ones.
Measure the inner diameter D in the lower head of the connecting rod assembly with the cover in three directions with a caliper:
- - along the connecting rod;
- – at an angle of 45° clockwise and counterclockwise to the previous direction.
Determine the ovality of the bottom end of the connecting rod by subtracting the smaller value from the larger measured value.
If the ovality is greater than 0.05 mm, replace the connecting rod with the cap.
Measure the thickness T of the connecting rod bearings with a caliper.
Measure the diameter Dн of the connecting rod journal of the crankshaft with a micrometer.
The connecting rod journals of the crankshaft are divided into three classes according to the nominal diameter:
- - class 1 (Dн = 47.960–47.954 mm);
- - class 2 (Dн = 47.954–47.948 mm);
- - class 3 (Dн = 47.948–47.942 mm).
Calculate the gap z between the connecting rod bearings and the crankshaft journals using the formula z = Dв - 2T - Dн.
The nominal design gap is 0.018-0.045 mm.
The maximum allowable gap is 0.1 mm.
If the actual design clearance is less than the limit, you can reuse the liners that were installed.
If the gap is greater than the maximum allowable, it is necessary to replace the liners on these necks with new ones of a nominal thickness of a suitable class.

To measure the gaps between the liners and the crankshaft journals, you can use a calibration wire

To measure the gap, cut off a piece of calibration wire, the length of which is 2 mm shorter than the width of the liner

We place the gauge in the axial direction on the shaft neck

We cover with a lid with an installed insert.
So that the gauge does not move when the cover is installed, we glue it with grease

Tighten the cover nuts first with a torque of 17.7-21.6 Nm, and then tighten the bolts by 88-92°

Using the supplied measuring template, measure the width of the indentation of the flattened gauge wire.

Imprint may remain on shaft journal "A" or bushing B.
According to the conversion table printed on the template, we determine the gap in the connection
The end surface of connecting rod bearings of classes 1 and 3 is marked with a marking that differs in color: class 1 bearings are marked with black paint, class 3 - green.
Class 2 inserts are not marked.

Insert the connecting rod into the piston, lubricate the piston pin with engine oil and press it into the connecting rod.
The piston should be pressed with the boss against the upper head of the connecting rod in the direction of pressing the pin, which will allow it to take the correct position.
The direction of pressing must match the direction of the arrow marked on the top of the piston.
Install the piston rings on the piston
Compression rings are installed with the markings up

Orient the rings as shown.

Installing the bushing into the connecting rod, aligning the mounting tab of the bushing with the notch on the connecting rod

We install a mandrel on the piston to compress the rings and, screwing in the screw, compress the rings
Turn the crankshaft so that its crankpin, on which we mount the ShPG, was installed at TDC.
Install the cylinder piston in accordance with the marking of the cylinder number on the connecting rod

We press the hammer handle and shift it from the mandrel into the cylinder until the lower connecting rod head is installed on the crankshaft crankpin.
When installing the pistons in the cylinders, the arrows on the pistons must point towards the front of the engine
When installing the piston, the tool must be pressed firmly against the cylinder block, otherwise the piston rings may be broken.
Install the piston into the cylinder carefully so that the lower head of the connecting rod does not damage the connecting rod journal of the crankshaft.
Install the connecting rod bearings into the connecting rod caps, aligning the insertion tab of the bearing with the notch on the cap.
Lubricate the bearings in the connecting rod caps and crankshaft journals with engine oil.
Install the connecting rod cap by connecting the connecting rod to the crankshaft journal.
Install the connecting rod cap bolts.
We tighten the bolts in the following order: first, with a torque of 17.7-21.6 Nm, and then we tighten the bolts by 88-92 °
Check the side clearance of the connecting rod, it should be within 0.10-0.25 mm.
The maximum allowable gap is 0.35 mm.
Increased clearance indicates excessive wear on the crankshaft crank webs. In this case, we replace the crankshaft.

")
")
")
")
")
")
")
")