Cooling system — liquid, closed type, with forced circulation
Consists of an expansion tank, coolant pump, engine cooling jacket, thermostat housing, thermostat, radiator with electric fan, and connecting hoses.
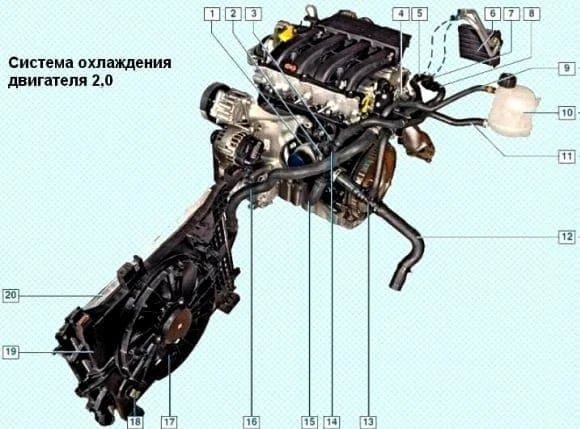
1 - heat exchanger; 2 - heat exchanger outlet hose; 3 - heat exchanger inlet hose; 4 - thermostat housing; 5 - heater radiator inlet hose; 6 - heater radiator; 7 - heater radiator outlet hose; 8 - air bleed nipple; 9 - steam outlet hose; 10 - expansion tank; 11 - filler hose; 12 - radiator outlet hose; 13 - tee; 14 - branch pipe; 15 - pump fluid supply hose: 16 - radiator inlet hose; 17 - fan impeller; 18 - additional resistor; 19 - fan casing; 20 - Radiator
The heater radiator, located in the vehicle's interior, and the heat exchanger (2.0 engine) are connected to the cooling system.
The system is filled with coolant through the expansion tank neck.
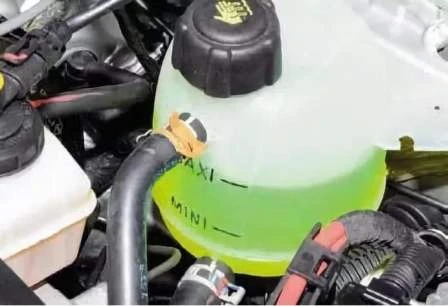
The expansion tank, mounted in the engine compartment on the left mudguard cup, is made of translucent plastic, allowing you to visually monitor the coolant level. fluid.
The expansion tank wall has MAX and MIN marks; the fluid level should be between these marks when the engine is cold.
A steam bleed hose is connected to the top fitting of the tank, connecting the tank to the thermostat cover.
The expansion tank filler hose and the radiator outlet hose are connected to the coolant pump inlet pipe hose using a plastic branch pipe.
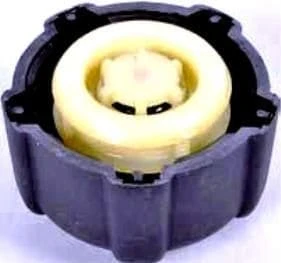
The cooling system is sealed by inlet and outlet valves in the expansion tank cap.
The outlet valve maintains a higher pressure in the system than atmospheric pressure when the engine is hot.
This increases the boiling point of the coolant and reduces vapor loss.
The inlet valve opens when the system pressure drops as the engine cools.
If the cap is lost, do not replace it with a sealed cap without valves, even if it is the correct size and threads. This will lead to an unacceptable increase in pressure in the cooling system (when the engine is hot) and, as a result, coolant leaks from under the hoses.
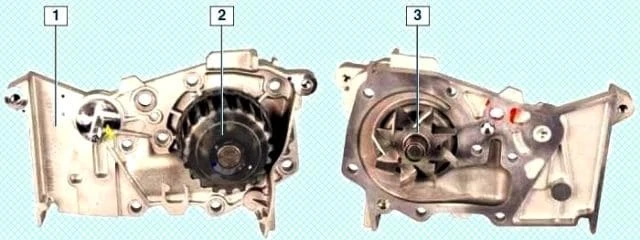
The coolant pump, located on the right side of the cylinder block, circulates the coolant in the cooling system. The coolant pump is a vane, centrifugal type.
The pump is driven by the timing belt from the crankshaft pulley. On the 1.6 engine, this is done by the toothed side of the belt, and on the 2.0 engine, this is done by the reverse (flat) side of the belt.
The pump consists of a housing, a bearing assembly with a seal, an impeller, and a drive pulley.
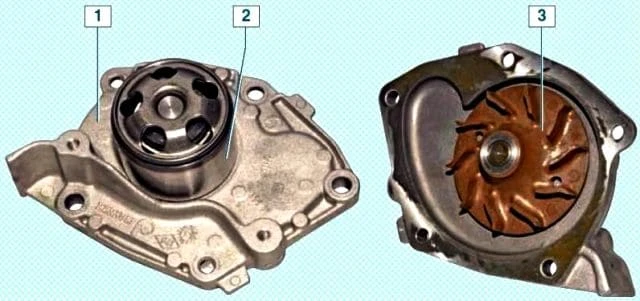
Fluid enters the pump through its inlet pipe, located on the front wall of the cylinder block.
From the pump, pressurized fluid enters the cooling jacket of the cylinder block, then the cooling jacket of the cylinder head, and from there to the thermostat housing, attached to the left end of the cylinder head.
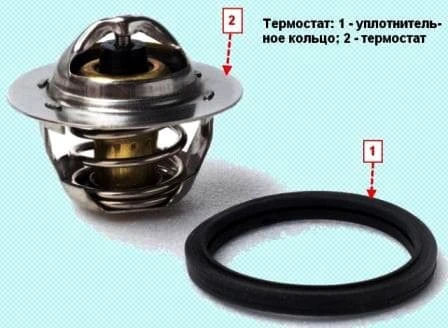
The thermostat, located in the housing and covered by a lid, accelerates engine warm-up, automatically maintains its thermal conditions within specified limits, and regulates the amount of fluid passing through the radiator of the cooling system.
A metal cylinder with a temperature-sensitive filler (sock) is installed inside the thermostat.
The cylinder is hermetically sealed with a rubber insert.
When heated, the filler melts and expands, compressing the insert.
The rubber insert deforms, causing the membrane to bend. and moves the rod that controls the thermostat valve.
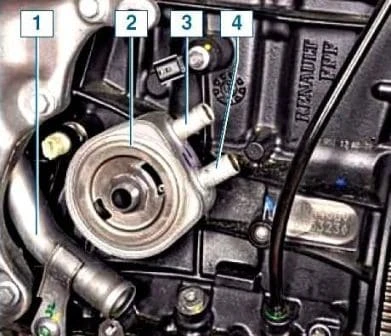
Elements of the 2.0L engine cooling system, located on the front wall of the cylinder block: 1 - coolant pump inlet pipe; 2 - heat exchanger; 3 - fluid inlet pipe; 4 - fluid outlet pipe.
When the engine is cold, the thermostat valve is closed and blocks the thermostat cover pipe leading to the cooling system radiator.
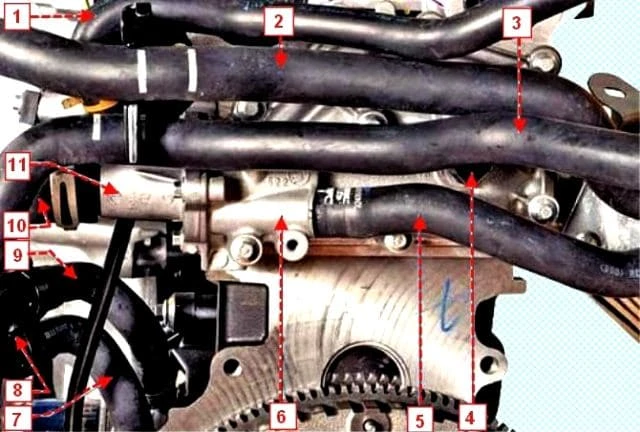
2.0 engine cooling system components: 1 - steam outlet hose; 2 - heater radiator outlet hose; 3 - filler hose; 4 - coolant temperature sensor; 5 - heater radiator inlet hose; 6 - thermostat housing; 7 - heat exchanger outlet hose; 8 - branch pipe; heat exchanger inlet hose; 10 - radiator inlet hose; 11 - thermostat cover.
In this case, the entire The fluid enters the heater core through the thermostat housing, bypassing the cooling system radiator, and returns to the pump—a small circulation loop.
The fluid circulates continuously through the heater core and heat exchanger (2.0 engine) and is independent of the thermostat valve position.
As the engine warms up, at a coolant temperature of approximately 89°C, the thermostat valve begins to move, allowing fluid to flow into the cooling system radiator.
At a temperature of 95±2°C, the thermostat valve opens fully, and the fluid enters the cooling system radiator, where it transfers heat to the surrounding air.
The movement of fluid through the engine cooling jacket and the cooling system radiator forms a large circulation loop.
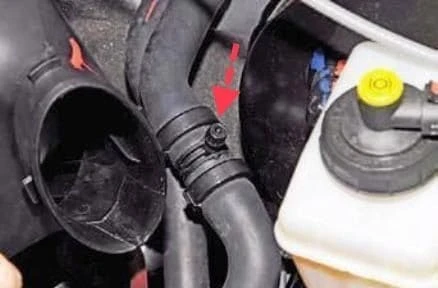
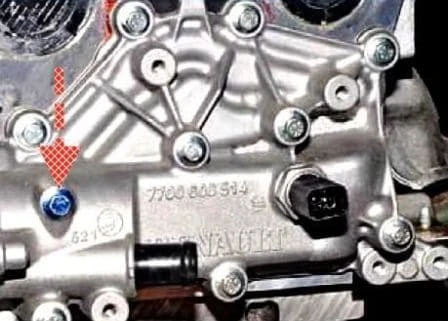
The heater radiator outlet hose has a nipple, and the thermostat housing has a screw plug for bleeding air from the cooling system when filling it with fluid.
The fitting on the hose is covered with a cap.
On the 2.0 engine, two hoses connected to the plastic branch pipe (which also connects the filler hose, the radiator outlet hose, and the coolant supply hose to the pump pipe) ensure the circulation of coolant through the engine heat exchanger.
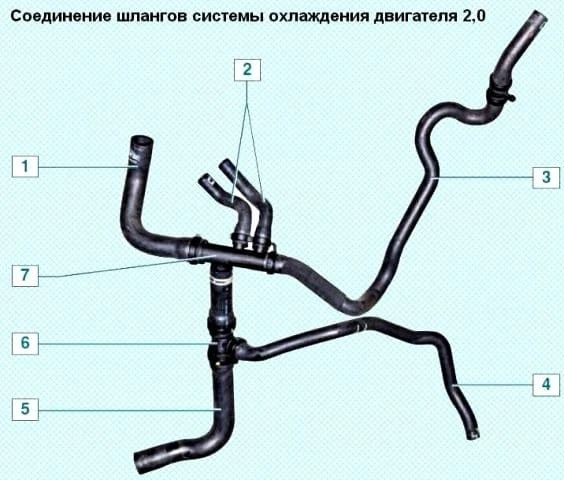
1 - Coolant pump inlet hose; 2 - Heat exchanger hoses; 3 - Heater radiator outlet hose; 4 - Expansion tank filler hose; 5 - Radiator outlet hose; 6 - Tee; 7 - Branch pipe.
The cooling system radiator is attached to the fan shroud.
The radiator consists of two vertically positioned plastic tanks connected by aluminum tubes with cooling fins.
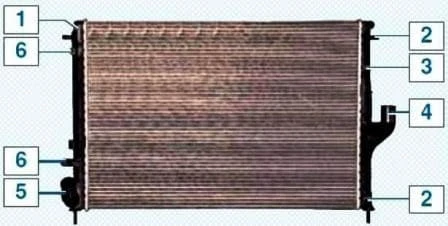
Cooling system radiator: 1 - left tank; 2 - right tank attachment points to the fan shroud; 3 - right tank; 4 - radiator inlet pipe; 5 - radiator outlet pipe; 6 - Left tank attachment points to the fan shroud
Fluid enters the radiator through the upper hose in the right tank and is discharged through the lower hose in the left tank.
There is no drain hole in the radiator.
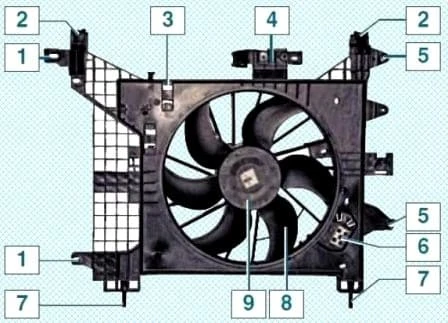
Radiator fan with shroud assembly: 1 - holes for mounting the right radiator tank; 2 - upper shroud mounting bracket; 3 - shroud; 4 - power steering reservoir mounting clamp; 5 - holes for mounting the left radiator reservoir; 6 - additional resistor; 7 - lower casing support pin; 8 - impeller; 9 - Electric motor shaft
The electric fan is installed in a shroud that is attached to the upper crossmember of the radiator frame at the top and to the front suspension subframe at the bottom.
As the coolant temperature rises, the fan is activated by a command from the engine control unit (ECU) via a relay.
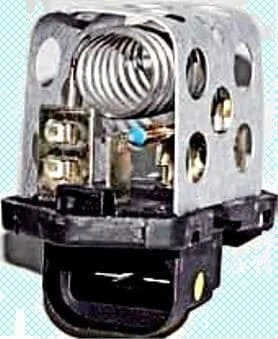
An additional resistor is installed on the fan shroud.
When the coolant temperature reaches 99° The ECU turns on the fan motor via an additional resistor, and the fan rotates at low speed.
When the coolant temperature drops to 96°C, the fan turns off.
When the coolant temperature reaches 102°C, the ECU turns on the electric motor, bypassing the resistor, and the fan rotates at high speed.
If the coolant temperature exceeds 118°C, the engine overheat indicator lights up in the instrument cluster.
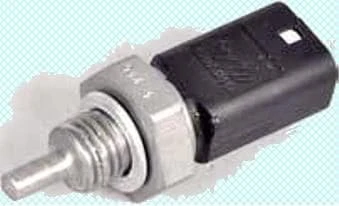
The coolant temperature sensor is screwed into a threaded hole in the thermostat housing..
The sensor sends information to the temperature gauge in the instrument cluster, the engine overheat warning light, and the engine management system's electronic unit.
Possible cooling system malfunctions, their causes, and solutions
- Cause of malfunction - Solution
The engine is overheating:
- - Low coolant level in the expansion tank - Top up coolant
- - Faulty thermostat (valve stuck in the closed position) - Replace thermostat
- - Faulty water pump - Replace water pump
- - Radiator pipes, hoses, and engine cooling hose are clogged with scale and sludge deposits - Flush the cooling system and Fill with fresh coolant.
- - Electric. The fan does not turn on due to an open electrical circuit or a faulty sensor, relay, or fan motor. - Check and repair the electrical circuits. If necessary, replace the sensor, relay, or fan assembly.
- - Damaged valve in the expansion tank cap (the valve is constantly open, causing the system to be under atmospheric pressure). - Replace the expansion tank cap.
The engine overheats, cold air comes from the heater:
- - Excessive drop in coolant level due to a leak or damage to the cylinder head gasket, which causes vapor lock in the engine's water jacket. - Repair the coolant leak. Replace a damaged cylinder head gasket.
The engine takes a long time to warm up to operating temperature, the thermal conditions while driving are unstable:
- - Faulty thermostat (valve stuck open) - Replace the thermostat.
The coolant level in the expansion tank is constantly decreasing:
- - Leaky radiator - Replace the radiator.
- - Leaky expansion tank - Replace the expansion tank.
- - Leaky water pump seal - Replace the water pump
- - Coolant leaks through leaky pipe and hose connections - Replace the hose clamps
- - Cylinder head bolts not tightened sufficiently (during prolonged parking with the engine cold, coolant leaks from the joint between the cylinder head and the cylinder block; traces of coolant may also appear in the engine oil) - Tighten the cylinder head bolts to the specified torque
- - Leaky radiator - Replace the heater core


