
We replace the valve stem seals when repairing the cylinder head, as well as when the caps are worn out
A sign of wear on valve stem seals is increased oil consumption, as well as the presence of blue smoke from the exhaust pipe after starting the engine and when braking the engine after a long drive under load.
An indirect sign is also the oiling of the electrodes of the spark plugs.
To do the job, you need tools: socket heads for 10, 16, 18, a key for 13, a set of screwdrivers, a Torx E14 head, a retainer for setting the TDC, a camshaft retainer, a torque wrench, pliers, tweezers

Valve spring compressor

Pliers for oil scraper valves

Or you can use an inertial oil seal remover.
Preparing the car for work.
Disconnect the negative battery terminal.

We remove the cylinder head cover (article - Removing the cylinder head cover of the Renault Duster engine)

Removing the cylinder head (article - Replacing the cylinder head gasket of a Renault Duster car)
If you have some experience, then you can replace the valve stem seals without removing the cylinder head.

Remove rocker arms and valve lifters
We mark hydraulic compensators and valve levers in accordance with their places so as not to be confused during installation.

We screw the cylinder head cover bolt into the hole in the cylinder block to install the valve spring compressor.
The piston of the cylinder in which we remove the valve stem seals is set to TDC (if we perform the operation without removing the cylinder head).
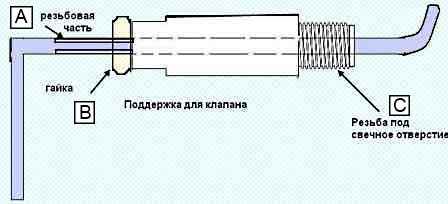
Compressed air or bar support can be used to support the valves.
You can use a tin rod.

Install the spring compressor and compress the spring

Using tweezers or a magnetized screwdriver, remove two crackers from the spring plate.
After that, remove the fixture.
If the force of moving the lever of the device increases significantly, and the crackers do not come out of the valve groove, you need to apply a light blow with a hammer on the spring plate, which Both crackers are free.

Remove the spring plate

Retrieve the spring

We install the collet of the inertial puller on the oil scraper cap, with two or three sharp blows of the puller head we achieve fixation of the cap in the collet bushing.
Remove the valve stem seal by pulling the puller straight up.
Setting caps
If the set of new caps includes an installation sleeve, we put it on the valve stem to protect the working edge of the cap from damage with the sharp edges of the grooves for crackers on the valve stem.

Before installing new valve stem seals, it is recommended to remove the springs from them, otherwise the caps can be damaged when they pass through the grooves for crackers on the valves.
We dip the valve stem seal into the engine oil and install it by hand on the valve guide.
Install the puller or mandrel on the new valve stem seal.
In the absence of a special device, you can select a cylindrical mandrel of a suitable diameter and press the cap through it with light hammer blows on the mandrel.
You can use the long head from the toolbox as a mandrel.
Select a head with 12 faces and a chamfer inside the hole so that the contact of the head with the cap is in a solid circle.
With light blows of the striker or hammer, we press the cap until it stops
We put the spring on the cap, if it was removed
Install springs and spring plates.
By compressing the springs, we install the crackers so that they fit into the grooves of the valve stem.
After installing the crackers and removing the device for compressing the valve springs, we apply several light blows with a hammer on the end of the valve stem so that the crackers are fixed in the groove of the stem.
If the crackers installed with a warp remain unfixed, when the engine is started, the “dry” valve will fall into the cylinder, which will lead to engine breakdown.
In the same way, we replace the valve stem seals on the remaining valves of the cylinder head.
Install the hydraulic lifters and valve lifters.
Install all parts in reverse order.

")
")
")
")
")
")
")
")