
We remove the basket and the clutch disc for replacement if they fail, as well as when replacing the flywheel and the rear crankshaft oil seal
We perform work on a viewing ditch or overpass.
Removing the gearbox (see article - Removing and installing manual transmission Renault Duster)

With a head of 11, we unscrew the six bolts securing the basket to the flywheel.
We keep the flywheel from turning by inserting a powerful screwdriver or mounting spatula between its teeth and resting it on the gearbox mounting pin.
First, we unscrew the bolts evenly, no more than one turn per pass, so as not to deform the diaphragm spring.
As soon as the action of the diaphragm spring weakens, we unscrew the bolts arbitrarily.
When unscrewing the last bolt, we support the basket and the clutch disc.

Remove the clutch basket and driven disc.
Install the slave drive and basket in reverse order.

When installing the driven disk, orient its protruding part to the clutch basket.
We place the clutch basket on the flywheel so that the flywheel pins fit into the corresponding holes in the basket.
We insert the centering mandrel into the slots of the driven disk and insert the mandrel shank into the hole of the crankshaft flange.
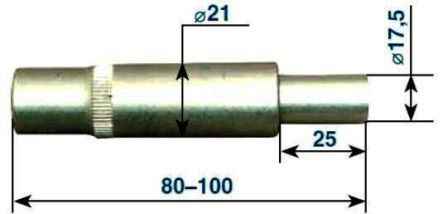
The mandrel can be machined from any material to size.
We bait and evenly tighten the oppositely lying bolts of the drive disc casing to the flywheel.
Clutch mounting torques:
- - bolt/nut securing the clutch housing to the engine 44 Nm;
- - bolt securing the clutch cover to the flywheel - 20 Nm;
- - bot for fastening the clutch slave cylinder to the gearbox - 25 Nm.
We remove the centering mandrel of the driven disk and install the gearbox.
We install all the parts in the reverse order and bleed the clutch hydraulic drive.

")
")
")
")
")
")
")
")