
In the article, we will consider the removal of the carburetor filter and its adjustment
We prepare the car for the task and remove the air filter housing, as indicated in the article "Replacing the fuel system filters UAZ-3151, -31512, -31514, -31519"

Loosen the clamp with a screwdriver

And remove the fuel hose from the fuel inlet fitting

Using a 22 wrench, unscrew the fitting bolt

And remove it together with the fitting

Remove the fitting, filter and sealing washers from the bolt
We wash the parts in a solvent, blow with compressed air and install the parts in reverse order
Idle adjustment
The idle speed is adjustable to ensure stable engine idling with a minimum content of carbon monoxide (CO) and hydrocarbons (CH) in the exhaust gases.

To adjust the idle speed, the carburetor has a quantity screw that reduces or increases the amount of air-fuel mixture entering the engine

There is also a quality screw designed to adjust the composition of the mixture
A plastic limiter cap is pressed onto the quality screw at the factory. It does not allow you to violate the factory settings
If there is no gas analyzer, the quality screw with a limiter and the quantity screw can only adjust the idle speed without significantly changing the composition of the exhaust gases
The adjustment is carried out on the engine, warmed up to the operating temperature of the coolant 80-90 ° C, with adjusted ignition and clearances in the valve drive, with the air damper fully open.
By turning the screws, using a car tester with a tachometer function, we adjust the idle speed with a powerful electric current consumer turned on (headlights in high beam mode).
If it is not possible to adjust the idle speed with a restrictive cap, break the cap with a screwdriver and repeat the adjustment using a gas analyzer.
This work is recommended to be done at a service station
Fuel level adjustment
We prepare the car and install it on a horizontal platform
Remove the air filter housing, as described in the article "Replacing the fuel system filters UAZ-3151, -31512, -31514, -31519"

We unscrew the three nuts securing the adapter to the carburetor with a 10 wrench and remove the adapter from the carburetor studs

With a flat screwdriver, unscrew the seven screws securing the cover to the carburetor body

In order not to damage the adapter gasket, remove it from the carburetor

Lift up the carburetor cover

And we remove the lower end of the air damper drive rod from the hole of the overhead lever of the trigger control cam

Remove the lid and cardboard pad
Pump the fuel into the float chamber of the carburetor with a manual drive of the fuel pump

With a caliper we measure the distance between the upper plane of the float chamber body and the fuel level
It should be within 19-22 mm

If this is not the case, remove the float and adjust the fuel level by bending the tongue
If the adjustment does not give a positive result, the level above - the needle valve is leaking, the level below - the float is leaking, or the fuel pump is faulty.
Check the tightness of the float by immersing it in hot water.
If air bubbles are released at the same time, we replace the float.
We check the tightness of the needle valve by setting the float in place.
Pull the float up, close the valve and pump fuel with the pump.
The sealed valve must not allow fuel to pass through. We replace the defective valve.
Installing the carburetor cover
Adjusting the launcher
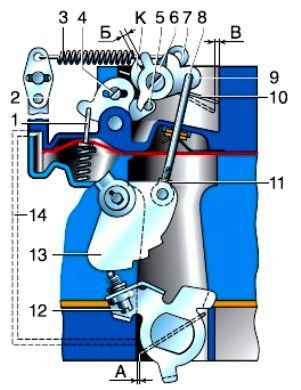
Scheme of the starting device: 1 - diaphragm mechanism rod; 2 - the left side of the two-arm trigger lever; 3 - air damper closing spring; 4 - coupling screw of a two-arm lever; 5 - emphasis on the right side of the two-arm lever; 6 - lever at the front end of the air damper axis; 7 - closing lever at the rear end of the air damper axis; 8 - thrust starting device; 9 - intermediate lever; 10 - air damper; 11 - threaded head at the end of the rod (for early models of carburetors); 12 - adjusting screw-stop for slightly opening the throttle; 13 - cam; 14 - channel for supplying vacuum to the diaphragm of the starting device; A, B, C - gaps; K - lever protrusion 9
We remove the carburetor from the engine, as described in the article "How to remove and install the carburetor of a UAZ-3151, -31512, -31514, -31519"

We slightly open the throttle, move the trigger lever all the way to the left and fix it in this position with a wire or cord

With a round gauge (for example, a drill), we check the gap between the edge of the throttle valve and the wall of the mixing chamber
The gap should be within 1.5-1.8 mm

With a key of 8, loosen the locknut, turn the stop screw with a screwdriver, set the required clearance

With the starter control lever turned all the way and the air damper completely closed, use a set of probes to check the gap between the levers on the air damper axis.
It should be within 0.2-0.8 mm

In the event that the gap does not match the values, loosen the screw securing the overhead lever on the trigger cam with a screwdriver

With a larger gap, move the overhead lever up, and if there is no gap, move it down (within the slot for the fastening screw)
On early carburetors, the specified gap is adjusted by changing the length of the choke actuator rod. For this, a threaded head is installed on the rod.

We sink the L-shaped rod of the starting device, with a drill we check the gap between the lower edge of the air damper and the wall of the diffuser
It must be within 6±1 mm

To set the required clearance, loosen the screw tightening the parts of the two-arm lever
Changing the mutual position of the halves of the lever, set the required clearance and tighten the screw. We check the gap and, if necessary, repeat the adjustment.

")
")
")
")
")
")
")
")