The car accelerates poorly
There are many reasons for the deterioration of dynamics, the main ones can be defined as follows.
Engine malfunction - decreased compression in one or more cylinders, coking of the exhaust system or damage to the catalytic converter of exhaust gases.
Fuel system malfunction - clogging of the engine fuel injectors, fuel filter, pipes and hoses of the fuel supply system. Use of low-quality fuel.
Malfunction of the boost system - failure of the turbocharger or loose fit of the system hoses on the intercooler or turbocharger pipes.
Malfunction of the engine management system - failure of the system sensors
If any sensor fails, the electronic control unit switches to operation according to the backup program, allowing you to get to the garage or car service, but at the same time the power and economic characteristics of the engine are reduced.
Slippage of the clutch due to wear or malfunction of its release drive.
Malfunction of the brake system - braking of one or more wheels while driving, incorrect adjustment of the parking brake.
Insufficient air pressure in the tires.
Overloading of the vehicle.
Check and bring the air pressure in the tires to normal.
Check the operation of the working brake system and parking brake
It is not necessary to remove the wheels for this. Find a flat section of the road and in dry, windless weather, conduct a test run to determine the coasting of the car.
The car must be fully fueled, with only the driver in the car.
Accelerate the car to 50 km/h, level off the speed, then disengage the gear and coast to a complete stop.
Make another run in the opposite direction. The coasting should be about 500 m.
Check the clutch operation
The initial check is carried out on a flat area free of obstacles. Set the accelerator pedal to an increased idle speed - about 1500 min-1.
Brake the car with the parking brake. Press the clutch and engage first gear.
Then begin to smoothly release the clutch pedal. If the engine stalls, the clutch is working properly and is not slipping.
If the engine does not stall, the clutch is worn out and requires replacement (manual adjustment of the clutch is not provided during operation, wear is automatically compensated for by a special device in the hydraulic drive slave cylinder).
The engine stalled while driving
- First, find out if there is fuel in the tank.
- Turn on the ignition and look at the fuel gauge.
- If the orange reserve fuel lamp does not light, and the gauge arrow shows the presence of fuel, it can be assumed that there is fuel in the tank.
- Open the hood and carefully inspect the underhood space.
- Pay attention to the integrity of all units.
- Check if all the wires are in place, if there are any torn, burnt, or damaged insulation.
- Inspect the supply line, it may be pinched or clogged (in particular, paraffin deposits, usually due to low-quality diesel fuel or non-compliance with the season of operation, in this case, after parking the car for several hours in a warm room at an air temperature of at least +10 ° C, the engine starts without problems).
- Paraffin deposits usually accumulate either in the fuel filter or in the coarse filter mesh in the fuel receiver module installed in the fuel tank.
- Paraffin clogging of filters can cause clogging of the injectors.
- Check the injection system fuse installed in the mounting block (article - Replacing fuses and relays GAZelle Next).
- Replace a blown fuse.
- Inspect the expansion tank of the cooling system - has the coolant leaked out? liquid.
- Also check the oil level in the engine crankcase.
- If everything is in order, proceed to check the engine management and power supply systems, which are described earlier.
- In addition, a sudden stop of the engine and the inability to subsequently start can be caused by a failure of the crankshaft position sensor or a disconnection of the wiring harness block from it.
The oil pressure has dropped
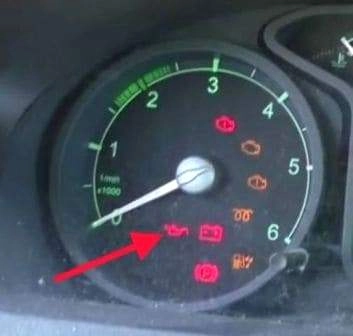
The instrument cluster of the GAZelle Next vehicle has warning light for low engine oil pressure.
For reliable engine operation, it is necessary that the engine lubrication system is constantly provided with sufficiently high pressure.
Open the hood.
Do not rush to check the engine oil level immediately, let it drain into the oil panter, it will take two or three minutes.
During this time, carefully inspect the engine - are there any fresh oil leaks on it.
Look under the front part of the car - is the engine oil pan punctured, are there any oil leaks.
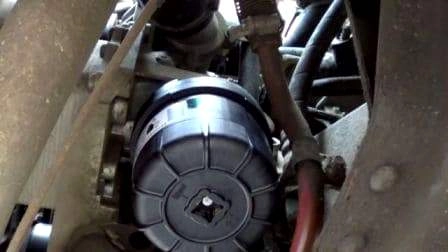
Pay attention to the oil filter.
Oil may leak from under the rubber gasket of the cover if it is damaged, or from the filter itself if the filter is weak tightened.
Sometimes it is enough to turn it a little clockwise.
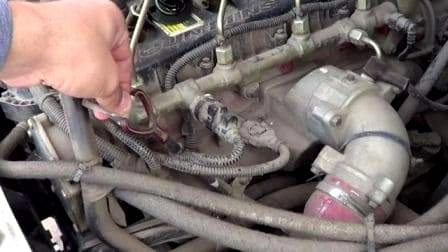
Remove the oil level dipstick
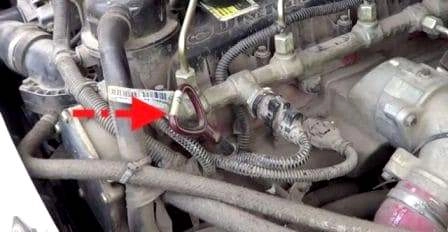
This is how the oil dipstick is located
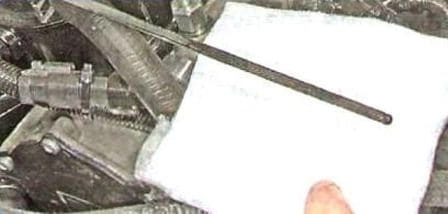
We wipe the dipstick with a cleaning cloth and insert it into place
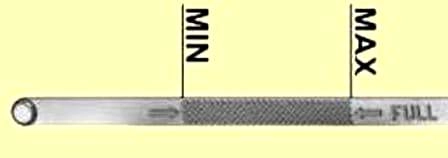
Repeat the dipstick.
If the oil level is close to the lower mark or below it, add oil to the norm.
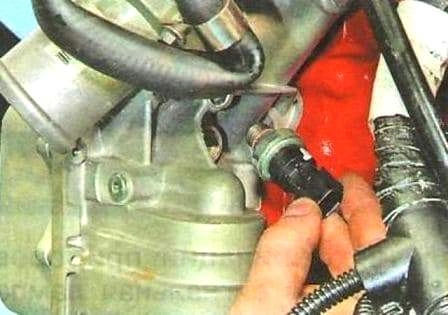
Start the engine. If the signal lamp goes out at a normal level, you can continue driving.
If the lamp still lights up, check the serviceability of the sensor oil pressure.
To do this, unscrew the standard oil pressure sensor and install a mechanical pressure gauge in its place.
If the pressure at minimum idle speed is more than 25 kPa (0.25 kgf/cm²) and increases with increasing speed, the sensor or its electrical circuit is faulty.
If you do not have a pressure gauge, all that remains is to check the reliability of the contact in the block with the sensor wires or replace the sensor with a known good one.
If after eliminating all visible causes the oil pressure in the engine is insufficient (the emergency oil pressure drop warning light is on), diagnose and repair the engine.
Engine overheating
The vehicle instrument cluster contains a coolant temperature gauge.
If the engine is overheating, the pointer approaches the red zone.
At the same time, the engine overheating warning light (shown in photo with an arrow).
At the first signs of overheating, if the temperature gauge needle has gone into the red zone, but no clouds of steam are escaping from under the hood, turn the handle for adjusting the temperature of the air entering the passenger compartment to the extreme right position, turn on the heater electric motor to maximum speed.
Let the engine run for a couple of minutes at normal idle speed, with the heater turned on at full power.
Do not stop the engine immediately! The only condition is to maintain the tightness of the cooling system.
If a hose bursts or comes off, or another leak occurs (except for liquid ejected from under the expansion tank cap), the engine will have to be stopped immediately!
After stopping an overheated engine, local overheating of the coolant begins in places of its contact with the most heat-stressed parts of the engine and the formation of steam locks. This phenomenon is called thermal shock.
- Stop the engine.
- Open the hood and inspect the engine compartment.
- Determine where the steam is coming from.
When inspecting the engine, pay attention to the presence of coolant in the expansion tank, the integrity of the rubber hoses, radiator, thermostat.
Never open the expansion tank cap immediately. The liquid in the cooling system is under pressure, when you open the cap the pressure will drop sharply, the liquid will boil, and its splashes can scald you.
If you want to open the expansion tank cap on a hot engine, first throw a thick wiping cloth on top and only then carefully but turn the plug.
Look under the dashboard - are there any coolant leaks from the radiator or heater hoses.
If coolant leaks are detected, the burst hose can be temporarily repaired using adhesive tape.
Reinforced (for example, silver) adhesive tape, which can be purchased at auto stores, is especially good for this purpose.
A radiator, thermostat or heater leak is quite difficult to fix on the spot, so in such a situation it is necessary to add water to the cooling system and carefully monitor the temperature gauge while driving, periodically restoring the level in the cooling system.
Long-term use of water instead of antifreeze leads to the formation of scale in the engine cooling system, deterioration of its cooling and, as a result, to a reduction in service life.
Never add cold water to an overheated engine. The engine must cool down with the hood open for at least 30 minutes.
If there is no coolant leak, check the integrity and tension of the auxiliary drive belt (article - Replacing the auxiliary drive belt Cummins ISF2.8).
Replace or adjust the tension of a torn belt.
The engine can also overheat if the thermostat, which regulates the flow of liquid in the cooling system through the radiator or past it (to speed up the warming up of a cold engine), fails.
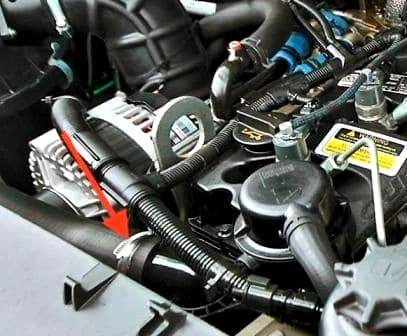
To check the thermostat, you need to feel the temperature of the upper hose on a warm engine.
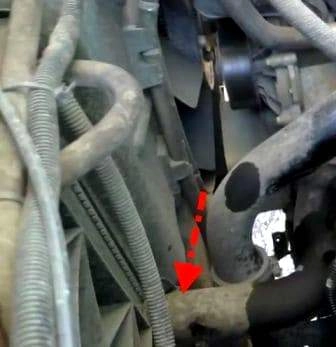
Check the temperature of the lower hose connecting to the radiator by touch
If the lower radiator hose is cold, the thermostat is faulty, there is no circulation through the radiator.
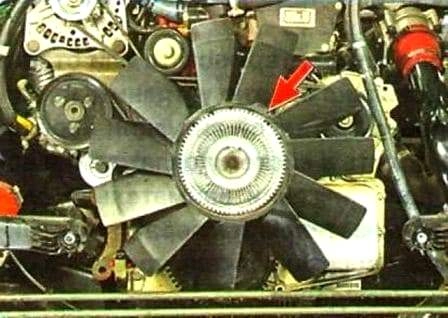
Often the cause of engine overheating is the failure of the viscous coupling, through which the fan impeller is driven.
Start the engine, monitor the temperature and pay attention to whether the cooling system fan starts to rotate when the engine overheats.
If it does not rotate, replace the coupling.
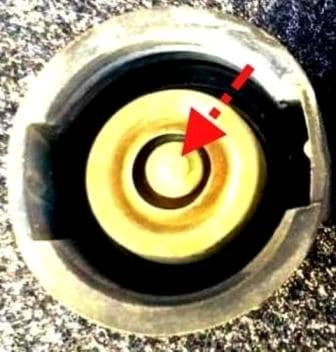
There are two valves installed in the expansion tank cap - an inlet and an outlet.
The outlet valve plays an important role in ensuring the optimal temperature regime of the engine.
It maintains an excess pressure of at least 0.10 MPa (1.1 kgf/cm²) in the system, ensuring an increase in the boiling point of the coolant and preventing intense vaporization.
When the valve jams in the closed position during overheating, a significant excess of excess pressure occurs - more than 0.15 MPa (1.5 kgf/cm²), which can lead to a rupture of the expansion tank or a breakdown of one of the hoses.
In turn, jamming of the valve in the open position leads to premature boiling of the coolant liquids.
The battery is not charging
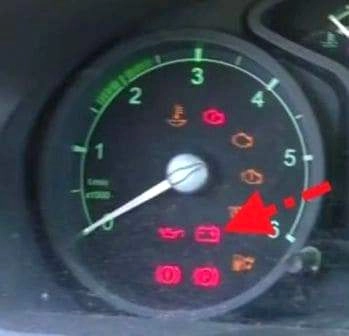
If the red battery discharge indicator light is on in the instrument cluster, it means that the current is not flowing from the generator to the on-board network and the battery's energy reserve is being consumed.
Operating a car with a lit battery discharge indicator light is unacceptable, since sometimes the reason for the light to come on may be a short circuit in the wiring, leading to a fire in the engine compartment car.
Stop the car, turn off the engine and determine what malfunction caused the lamp to light.
If the malfunction was not caused by a short circuit and the battery was fully charged, you can drive to the garage without the generator, but it is better to try to fix the malfunction on the spot.
Check if the accessory drive belt is broken. If the belt is intact, check its tension.
If the deflection is not within the norm, check the operation of the belt tensioner and, if it is in good condition, replace the belt (article - Replacing the Cummins ISF2.8 auxiliary drive belt).
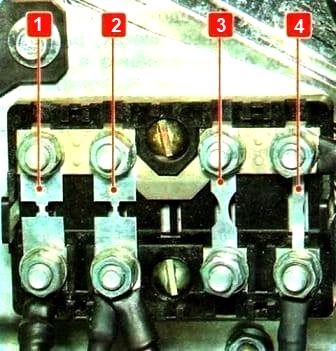
If the warning light still lights up after tightening the belt, check whether the 90 A fuse has burned out in the fuse block located in the engine compartment on the same bracket as the electronic engine control unit.
If the fuse has burned out, replace it and start the engine.
If the voltage reading on the display no longer flashes (the voltmeter needle is in the green zone of the scale, and the battery discharge warning light has gone out), then the voltage is normal and you can continue driving.
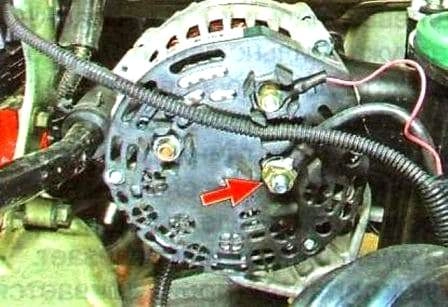
If the battery discharge warning light does not go out, check the wire going from the generator to the "+" terminal of the battery and the fastening of the power wire to the starter.
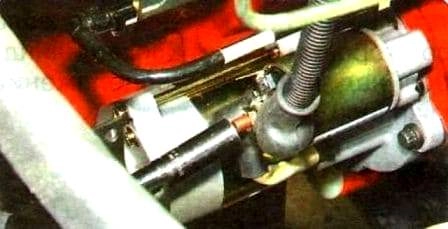
The wires may be torn, broken inside the insulation, or have oxidized or unreliable contacts.
Fix the problem and start the engine.
If charging current appears, you can continue driving.
If the battery discharge lamp does not go out after the measures taken, then the possible cause of the malfunction lies in the generator itself.
There may be several reasons, and it is better to fix them in a car service center or garage, and you can only hope that the energy reserve in the battery is enough to get to them.
In order to reduce current consumption when driving a car with a faulty generator, if possible, turn off the radio, unnecessary lighting devices, heater fan, etc.
There are extraneous knocks
- 1. Knocking of main bearings (heard in the very bottom of the cylinder block) is very dangerous; Stop the engine immediately, you will have to tow it to a service station or garage.
A low-pitched knock, noticeably increasing under load and with an increase in crankshaft speed.
Its appearance is often accompanied by a drop in oil pressure (the emergency oil pressure drop warning light is on almost constantly).
- 2. A knock from connecting rod bearings (heard in the middle of the cylinder block) is very dangerous; stop the engine immediately, you will have to tow it to a service station or garage.
The sound is rhythmic, ringing, metallic, medium-tone. It increases significantly with increasing load and completely disappears when the fuel injector is disconnected.
- 3. A knock from piston pins (heard in the upper part of the cylinder block) is dangerous; without overloading the engine, you can drive to the service station or garage yourself.
The knock is rhythmic, high-pitched, with a sharp metallic ringing sound, audible in all engine operating modes and intensifies with increasing engine load. It completely disappears when the fuel injector is disconnected.
The knock of worn pistons and cylinders (heard in the same part of the engine as the knock of piston pins) is harmless; without overloading the engine much, you can drive to the service station or garage yourself.
A sound reminiscent of the knock of clay dishes.
It is especially audible on an unheated engine, as it warms up it decreases or disappears.
- 4. Valve knocking (heard in the upper part of the engine near the cylinder head cover) is not dangerous, you can drive to a car service or garage yourself.
A metallic knock against the background of a general dull noise.
It is clearly audible at low and medium crankshaft speeds from the cylinder head side above the valve locations.
Knocking in the suspension
If extraneous knocking sounds appear in the suspension of a moving vehicle, it is necessary to immediately establish their source, regardless of whether it is constantthis is a knock or appears only when driving over uneven surfaces.
It is better to check the condition of the suspension by placing the car on an overpass, inspection pit or lift, and if this is not possible, you can do this work on a free level area, although with less convenience.
In any case, you will need an assistant.
Causes of knocking in the suspension and how to eliminate it
- Cause of malfunction - Method of elimination
- Faulty shock absorbers - Replace shock absorbers
- Loose bolts for fastening the stabilizer bars of the front and rear suspensions; worn cushions and rubber-metal joints of the bars - Tighten the bar mounts; if the rubber cushions are worn out, replace them
- Damage, deformation of the cushions of the upper mounts and bushings of the lower shock absorber mounts - Replace the cushions and bushings with torn, cracked or squeezed out rubber on one side
- Worn ball joints and front suspension mounts - Replace the ball joints and mounts
- Increased clearance in the front wheel hub bearings - Replace the bearings
- Large wheel imbalance - Balance the wheels
- Wheel rim deformation - Replace the rim
- Sediment or breakage of the front suspension spring - Replace the spring
- Worn rubber bushings in the front and rear spring lugs of the rear suspension, as well as in the frame brackets, in the holes for the pins spring earring fastenings - Replace torn or cracked bushings
- Knocking from suspension "breakdown" due to destruction of compression buffers - Replace damaged buffers
- Loosening of rear suspension spring U-bolt nuts - Tighten nuts
- Frequent rear suspension "breakdowns" due to rear axle overload - Avoid overload
Knocking in the driveshaft
Reason - Solution
1. Knocking in the driveshaft when changing gears abruptly and when changing gears:
- The nuts on the four driveshaft mounting bolts to the gearbox flange have come loose - Tighten the nuts
- The nuts on the two intermediate support mounting bolts to the frame crossmember have come loose - Tighten the nuts
- Worn bearings and universal joint crosspiece journals - Replace the crosspieces
Vibration in the driveshaft:
- Lost balance plate - Balance the shaft
- Incorrectly assembled spline joint (marks on parts are not aligned) - Install the parts according to the marks
- Increased runout of the sliding fork in the gearbox extension - Initially, move the fork on the splines by 180˚ and check if the runout decreases. If it does not decrease, replace the parts. After replacing the splined fork, balance the shaft
- Worn or broken one of the joints - Replace the joint or the cardan transmission assembly
- Broken or damaged flange of the rear axle drive pinion - Replace the flange
- Bent or crushed cardan shaft pipe - Replace the shaft
Increased noise in the cardan transmission:
Broken bearing separator of the intermediate support - Replace the support assembly
Knocking in the rear axle
Reason - Method of elimination
- 1. Loud noise (hum) from the axle:
- Loose tightening of the pinion flange nut - Tighten the nut
- Worn or damaged pinion or differential bearings - Check the condition of the bearings and replace them if necessary
- 2. Pulsating noise from the axle:
Loose tightening of the driven gear mounting bolts or it is installed at an angle - Tighten the driven gear mounting bolts and check its runout
- 3. High-pitched noise (howl):
- Insufficient oil level - Restore the oil level to normal
- Liquid oil is poured in - Change the oil (article - Checking and changing the oil in the gearbox and rear axle of the GAZelle Next)
- The contact between the teeth of the main gear is incorrectly adjusted - Check the contact patch and adjust it (article - Assembling and adjusting the GAZelle Next axle gearbox)
- Scuffs on the working surfaces of the main gear gears - Replace the gears
- 4. A loud knock in the axle during sharp acceleration after coasting or when turning:
Severe wear of the differential parts - Check the total play in the main gear and in the differential. Replace worn parts.
- 5. Continuous knocking and crunching in the bridge:
Worn teeth or bearings - Replace worn parts
Vibration and shocks on the steering wheel
Knocking from below can be caused not only by a malfunction of the suspension, but also by the steering of the car.
Check the steering.
Reason - Remedy:
- Increased clearance in the front wheel hub bearings - Replace the bearings
- Loosening of the nuts securing the ball joints of the steering rods - Tighten the nuts
- Increased clearance in the ball joints of the steering rods - Replace the tie rod ends
- Loose steering gear mount - Tighten the steering gear mount
A possible cause of vibration and impacts on the steering wheel when driving at speeds above 70-80 km / h may be an imbalance in the front wheels.
If impacts and vibration on the steering wheel appear when pressing the brake pedal, it is necessary to replace the brake pads, repair or replace the front brake discs.
Problems with the brakes
A decrease in the effectiveness of the car's braking, its skidding when braking, and beating of the brake pedal when braking should be a signal for an urgent brake check.
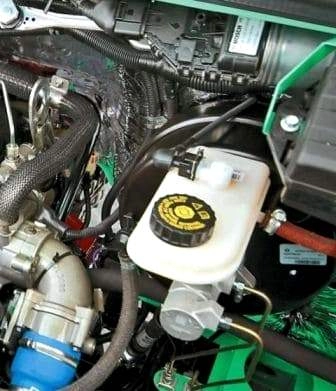
Check the brake fluid level in the master cylinder reservoir regularly.
The brake fluid level should be between the MAX and MIN marks on the reservoir wall (approximately at the level of the reservoir connector).
The reason for the loss of braking efficiency may be the poor operation of the vacuum booster.
For an express check, press the brake pedal several times with the engine off to relieve the vacuum in the booster, and then, holding the pedal, start the engine.
If the pedal has dropped slightly after starting the engine, the vacuum the booster is working properly.
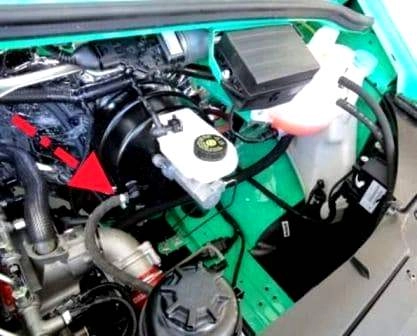
If the pedal remains motionless, check the integrity and reliability of the hose fastening to the check valve of the vacuum booster and to the engine vacuum pump.
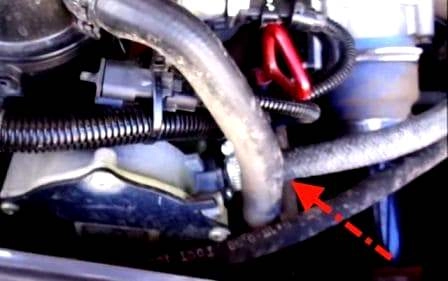
Replace or repair the faulty hose. If the hose is in good condition, the vacuum booster needs to be replaced.
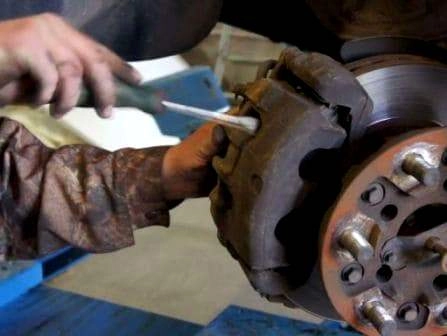
If braking is accompanied by beating and pulsating of the brake pedal, you should first check the condition of the front disc brakes.
After installing the car on a jack, remove the front wheel and check the mobility of the brake pads.
To do this, try to move the pads away from the brake disc with a screwdriver through the window in the caliper.
If the pads cannot be moved apart, then the pads have become loose in the caliper sockets or the piston has jammed in the brake cylinder.
A jammed brake cylinder piston causes constant braking of the corresponding wheel when the pedal is released, loss of directional stability and skidding of the car when braking.
After unscrewing the upper caliper mounting bolt, tilt the caliper back and check the mobility of the pads.
If they move with difficulty, clean the end surfaces of the pad bases and the sockets in the pad guide from dirt and rust, ensuring completely free movement of the pads.
At the same time, check the thickness of the pad linings. If it is less than 2 mm, replace the pads.
Inspect the brake disc. The brake disc thickness should be at least 30 mm.
The disc surface should be flat and smooth on both sides.
If the disc surface is covered with rust in places, which usually happens after a long period of parking of the car with un-dried brakes, try to clean the working surface with a fine-grained sandpaper.
If this procedure does not help, you will have to send the discs for grinding or replace them with new ones.
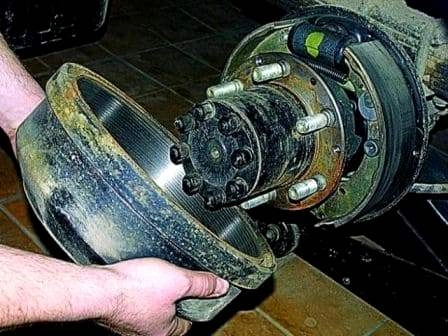
If braking is accompanied by jerks of the car and a squeak in the area of the rear wheels, the rear of the car skids when braking, check the condition of the drum brake mechanisms of the rear wheels.
Having installed the car on a jack, remove the rear wheels and brake drums one by one.
Measure the diameters of their working surfaces.
The inner diameter of the drum should be no more than 283.0 mm, the working surface of the drum should be even and smooth, without ring marks and clearly visible ovality (no more than 0.5 mm, it can be determined by uneven wear oh working surface of the drum).
If the inner diameter of the drum is larger than the permissible value, the ring marks are very deep or uneven wear of the working surface is clearly visible, the drum will have to be replaced with a new one.


