We remove the springs to replace the spring leaves or when replacing the spring assembly.
To do the job, you will need the following tools: Jack, 22, 24 keys, 24 socket head, hammer, punch, drift.
We install the car on an inspection ditch.
We loosen the tightening of the U-bolt mounting nuts.
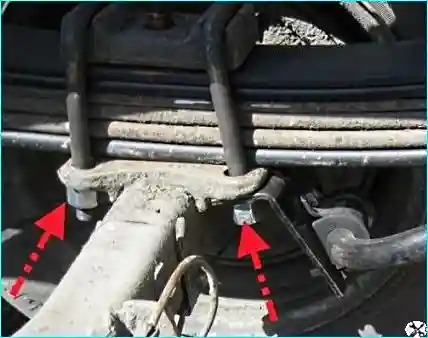
Unload spring, raising the rear of the car, and install a support under the rear of the frame.
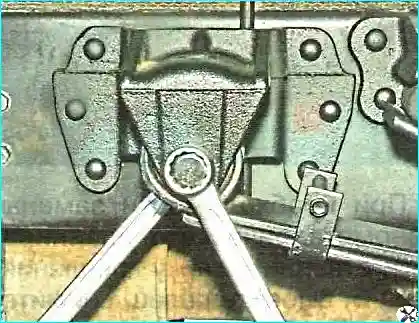
Unscrew the nut of the pin securing the front end of the spring to the bracket on the frame so that it remains flush with the pin, generously wet the hinge and pin with soapy water and, using a punch, knock out the pin through the mounting hole in the frame until the nut touches the bracket.
Unscrew the nut and finally knock out the pin with a punch, applying force to the end finger.
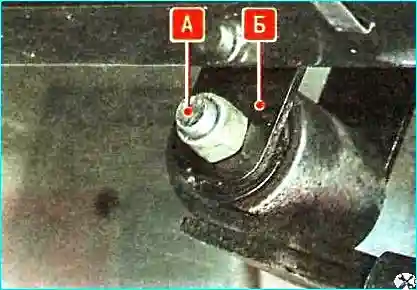
Unscrew the nut of finger "A" fastening the rear end of the spring to the earring "B". Wet the hinge and pin "A" generously with soapy water.
Knock out the lower pin "B", trying not to damage the thread.
Jack up the rear of the car by the frame so that the ends of the spring come out of the bracket and shackle.
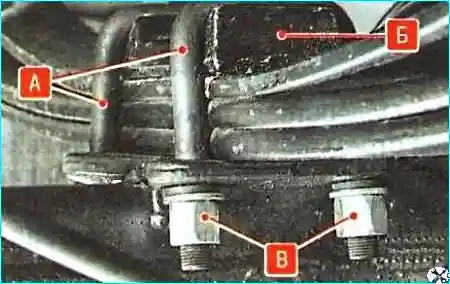
Finally unscrew the four nuts "B" of the spring U-bolts.
Remove the U-bolts "A" with the lining "B". Remove the spring.
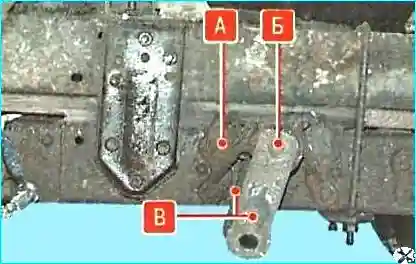
If it is necessary to replace the rubber-metal hinge of the earring, unscrew the nut of the fastening of the pin "B", knock out the pin, remove the cheeks "B" of the earrings and remove the hinge from the bracket "A".
Clean the spring from dirt. Clean the spring eyes from rust.
If necessary, replace the rubber-metal spring hinges.
To facilitate pressing the rubber-metal hinges, lubricate them with a thick soap solution and use special mandrels.
Inspect the pins.
They should not have visible signs of wear, deformation, rust, or dirt. The threaded part of the pins should not be damaged.
Inspect the springs.
There should be no cracks on the spring leaves.
If the above defects are found, replace the spring assembly or, having disassembled the spring, replace its defective leaves.
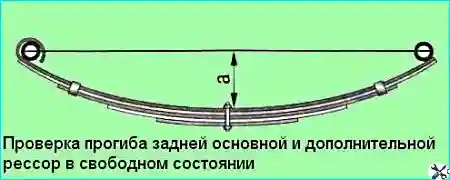
Check the spring deflection. To do this, compress the spring with a load of (750±15) kgf.
Pull a thin rope or wire between the centers of the spring eye holes and measure the distance "a" from the upper surface of the first leaf at the center bolt to the taut rope.
The measured distance "a" must be at least 47 mm for springs from group | and at least 57 mm for springs from group II.
The difference in deflection of both springs must be no more than 10 mm.
The spring group number is marked on the end of the front spring eye:
- — | group - one stroke of yellow paint;
- — || group — no marking.
Install the spring in the reverse order of removal, without completely tightening the threaded connections.
When installing, keep in mind that the short end of the spring should be directed forward in the direction of travel of the vehicle.
Load the spring using a special device and tighten the threaded connections of the spring mount to a torque of 120-150 Nm.
Tighten the two nuts of the earring pins evenly to avoid distortion of its cheeks.
The service life of the silent blocks depends on the correct installation.
Therefore, the threaded connections of the spring mount must be tightened only after preliminary compression of the springs.
It is most convenient to use a special device for this.
If there is no device, in the garage you can install the wheels and lower the car to the ground or lower the car to the support installed under the lower pad of the spring U-bolts.
When it is better to load the car body with ballast.
Disassembling and assembling the spring
Remove the spring as described above.
Mark the orientation of the sheets in the spring.
Clamp the spring in a vice, as close to the center bolt as possible.
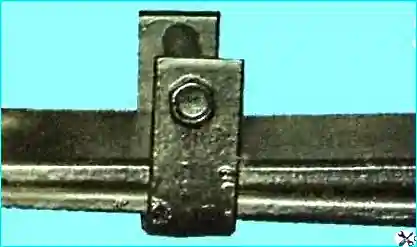
Unscrew the nuts of the bolts of the spring clamps.
Remove the bolts from the holes and remove the spacers bushings of clamps.
Unscrew the nut of the central bolt and take it out.
Slowly open the vice to gradually remove the load from the spring.
To assemble the spring, first select the required set of sheets and inter-sheet gaskets.
Fold the sheets in the appropriate order and install plastic gaskets between them.
Insert a metal rod into the holes of the sheets for the central bolt, the diameter of which is equal to the diameter of the bolt.
Squeeze the central part of the spring in a vice as close to the rod as possible.
Take out the rod and insert the bolt into the hole.
The head of the bolt should be at the bottom of the spring.
Screw on and tighten nut.
We install the bushings and bolts of the clamping clamps. Only after that we remove the spring from the vice.


