
The engine oil sump is sealed with a sealant-gasket
We replace the seal when a leak occurs or when the pan is removed
We install the car on a viewing ditch or lift
Drain the engine oil

We unscrew the four bolts securing the gearbox to the engine oil sump

We unscrew the thirteen bolts securing the oil sump (sump) to the engine block

Pry gently with a screwdriver and remove the oil sump
We clean the mating surfaces of the oil sump and cylinder block from the old sealant
We apply a special sealant-gasket to the mating surface of the oil sump with a roller of 3-4 mm, and the line for applying the sealant-gasket should pass from the inside of the mounting holes
No later than 10 minutes after applying the sealant, we install the oil sump on the cylinder block and screw in, without tightening, the pan bolts
To ensure a tight seal, the two subsequent operations must be completed no later than five minutes after installing the crankcase
We screw in the four bolts securing the gearbox to the oil sump and tighten them to a torque of 48 Nm (4.8 kgcm)
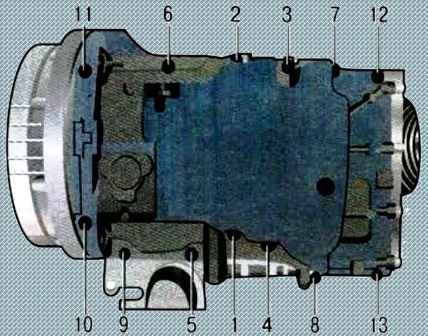
We tighten the crankcase mounting bolts in the order shown in the figure in two stages:
- - the first stage - pre-tightening with a torque of 20 Nm (2kgcm);
- - second stage - final tightening with a torque of 48 Nm (4.8 kgcm).
Pour oil into the engine no earlier than one hour after installing the oil sump. This time is necessary for the polymerization of the sealant

")
")
")
")
")
")
")
")