
In the previous article, we examined how to assemble the main engine components.
In this article, we will continue to assemble the VAZ-2112 engine components.

Lubricate the O-ring of the oil receiver with engine oil

It is advisable to replace the oil receiver sealing ring

We install the oil receiver in place and tighten the bolt securing the oil receiver to the oil pump with a torque of 7.0-8.0 Nm (0.7-0.8 kgf m).

We wrap two bolts securing the oil receiver to the cover of the second main bearing with a torque of 8-10 Nm (0.8-1.0 kgf m)

Cut off the protruding ends of the gland holder gaskets.

Lubricate the plane of the cylinder block with grease

Installing the oil pan gasket

Installing the pallet
If the pan is slightly deformed, then it is better to coat the gasket of the pan with sealant.

We tighten the oil sump mounting bolts with a torque of 5-8 Nm (0.5-0.8 kgf m).

Install the key in the groove of the crankshaft

Installing the crankshaft pulley

We put the toothed belt on the crankshaft pulley

Install the washer on the belt drive pulley

We put on the alternator drive pulley and bait the bolt with a washer

We tighten the pulley mounting bolt, holding the flywheel on the other side with a torque of 97.9 - 108.8 Nm (9.90 -11.1 kgf.m)
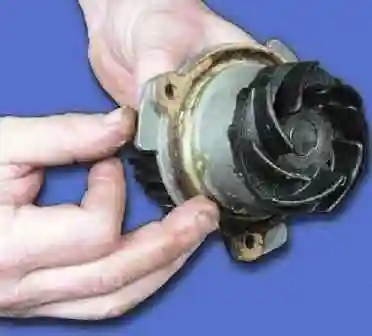
Install the sealing gasket on the water pump and lubricate the gasket with grease.

Install the water pump in the cylinder block so that the factory marking of the pump is directed towards the mating plane of the cylinder block, since the mounting bolts are asymmetrically located.
We tighten the coolant pump mounting bolts with a torque of 7.64–8.01 Nm (0.78–0.82 kgf.m)
After that, install the cylinder head as indicated in the article - "Removing and installing cylinder head".
Installing timing belt, installing the ramp with injectors, install the receiver, intake pipe.
Running in the engine after assembly
The repaired engine is subjected to bench tests (running in) without load according to the following cycle: 750–800 min -1 - 2 min
- 1000 min -1 - 3 min
- 1500 min -1 - 4 min
- 2000 min -1 - 5 min
Having installed on the stand and started the engine, check:
- – is there any leakage of coolant or fuel between mating parts and in pipeline connections;
- – oil pressure and whether there is oil leakage through the gaskets;
If extraneous knocks or malfunctions are found, stop the engine, eliminate them, and then continue testing.
If oil leaks through the gasket between the crankcase and the cylinder block, tighten the mounting bolts to the recommended torque.
If the oil continues to leak, check the gasket and replace if necessary.
If oil leaks through the gasket between the cover and the cylinder head, check the gasket and rubber bushings on the studs of the cylinder head cover.
If necessary, replace the gasket and bushings, following the recommendations set out in the article" Assembly of the engine".
After repairing the engine, a certain period of running-in of the working surfaces of new parts is necessary.
This is especially true for those engines on which pistons, connecting rod and main bearing shells have been replaced, crankshaft journals have been reground, and cylinders have been honed.
Therefore, during the break-in of a repaired engine, do not subject it to maximum loads.
The engine break-in must continue on the vehicle at the recommended driving speeds for the vehicle's break-in period.

")
")
")
")
")
")
")
")