
In this article, we will look at how to disassemble and remove the car cab door.
Preparing the car for the task.
Disconnect the negative battery terminal.
Removing the door trim
Pry off the front edge of the central control unit housing and detach it from the upholstery

We press the clamps of the wire blocks and disconnect them from the block connector

Remove the block

On the right door, pry off the power window control button and remove it

We press the lock of the wire block and disconnect the block from the connector

We unscrew the two screws securing the decorative trim of the armrest

Pry off the edge and remove the overlay

Unscrew the screw securing the inner handle

Pry off the edge of the handle body and detach it from the upholstery

Through the gap, disconnect the tip of the yellow cable braid from the holder on the handle body and turn the handle body with the inside up

Disconnect the tip of the lock drive cable from the handle lever and remove the handle

We unscrew the two screws of the bottom fastening of the upholstery to the inner panel of the door

Pry the upholstery up

We take out the upper curved edge of the upholstery from the four spring holders on the glass frame

Install the front door upholstery in reverse order.
Make sure the top folded edge of the upholstery engages with the spring clips on the glass frame.
Removing and installing power window
Tools required: TORX T25 and 10 wrenches, a special plastic mounting spatula or a flat screwdriver.
Lower the glass to about half its travel.

Remove the door upholstery and soundproofing gasket

Loosen the two fastening bolts and disconnect the glass from the slider

Raise the glass and fix it with adhesive tape in the upper position

Unscrew the bolt securing the front glass guide

Turn the guide so that it can be removed through the mounting hole in the door, and remove it from the door

Unscrew the lower window guide nut

We unscrew the upper window guide nut

We unscrew the three nuts securing the power window mechanism

We press the latch and disconnect the wire block from the power window motor

Remove the power window through the mounting hole of the inner door panel
Install the power window in reverse order

Assembling the door
Replacing the door sliding window
Tools will be required: TORX T25 wrenches, 10 and 8, a special plastic mounting spatula or a flat-blade screwdriver
Remove the door upholstery
Raise the glass and fix it with masking tape

Remove the power window

Unscrew the bolt securing the front glass guide
Turn the guide and remove it through the mounting hole

We unscrew the two screws securing the armrest trim bracket

Carefully lower the glass down
We take out the glass through the technological hole
Install the glass in reverse order.
Removing handles and door lock
You will need the same tools
Removing the inner handle
Unscrew the screw securing the inner handle
Pry off the edge of the handle body and detach it from the upholstery
Through the gap, disconnect the tip of the yellow cable braid from the holder on the handle body and turn the handle body with the inside up
Disconnect the tip of the lock drive cable from the handle lever and remove the handle
Install the handle in reverse order
Replacing the door lock switch
Remove the front door upholstery and soundproofing gasket

Disconnect the rod end from the ball pin of the lock switch leash

Remove the spring stopper

Remove the lock switch from the hole in the door panel

Install the switch in reverse order
Removing and installing the door lock
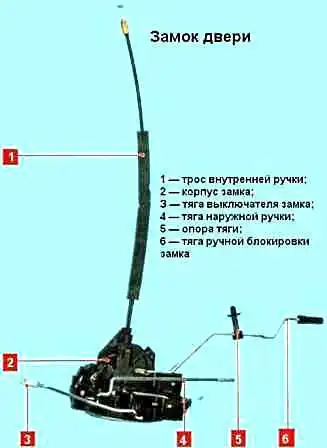
The lock mechanism is not repaired, it is replaced in case of failure
Remove the door trim, power window, sliding glass, as described above

Remove the outer handle

Using a screwdriver, disconnect the rod end from the ball pin of the lock switch leash

We unscrew the three screws securing the lock to the door panel

Remove the lock from the plane of the door

Remove the rod support from the door panel

We press the lock of the wire block, disconnect the block and remove the lock

Disconnect the rods from the outer and inner handles, also from the lock button

Install the lock in reverse order
When installing, apply a thread lock to the threaded part of the screws.
After installation, we check the operation of the lock, and, if necessary, adjust the length of the rods using plastic tips.
Replacing the outer door handle
Remove the door upholstery as described above.
Raise the glass up

Unscrew the four screws securing the handle

Technological holes are provided to gain access to the two rear and front upper screws for attaching the handle

Move the handle, mark the position of the lock drive rod end in the spring handle holder

Remove the rod end from the outer handle spring

Remove the handle

Before installation, lubricate the handle spring with lithol
Install the handle in reverse order.

The rod end is installed according to a pre-made mark.
Replacing the door stop
The limiter must clearly fix the door in two open positions and not prevent the doors from closing.
Squeak, crackle and play of moving parts are not allowed.
Replace the defective limiter.
Remove the door upholstery as described above.

Squeeze the holder and disconnect the speaker wiring harness block from the door panel

Remove the four screws securing the speaker

We take the speaker to the side by the length of the wires

Disconnect the speaker wire block and remove the speaker

We unscrew the two bolts securing the limiter to the panel

Unscrew the bolt securing the limiter to the rack
After disconnecting the limiter, do not open the door at a large angle, the outer panel of the door may be damaged.

Remove the limiter through the opening for the speaker

Install the limiter in reverse order
Removing and installing the door
Removing the front wing (article - Removing and installing the front wing GAZelle Next)

We pry off and remove the plug of the rear-view mirror mounting screw

Remove the three screws securing the mirror

We take the mirror away from the door, squeeze the latch, disconnect the wire block and remove the mirror

Disconnect the harness connectors located under the instrument panel on the left

We remove the wiring harness seal from the hole in the front pillar

Unscrew the door stop bolt
We install a support under the door or ask an assistant to hold the door.
We unscrew two bolts securing the upper and lower hinges to the cab sidewall and remove the door.
When installing the door, you need to maintain the gaps between the the door frame and the doorway.
Protrusion or recession of doors in the area of the lock up to 1.5 mm is allowed.
It is allowed to sink door surfaces relative to sidewall surfaces up to 2 mm.
For longitudinal and vertical adjustment of the door according to the gaps, it is necessary to loosen the bolts securing the door hinges to the cab sidewall and the bolt securing the limiter to the cab sidewall.
At the end of the adjustment, it is necessary to tighten the mounting bolts.

")
")
")
")
")
")
")
")