
A condenser (air conditioning radiator) of a multi-flow type is installed in front of the radiator of the engine cooling system
The condenser is attached with four brackets to the radiator tanks of the cooling system.
Condenser cells are thin-walled aluminum flat tubes.
Aluminum tanks with flanges for connecting pipelines.
The tanks are divided into sections along the height, therefore, passing through the condenser, the refrigerant flow changes direction several times.
In the condenser, the vapors of the refrigerant compressed by the compressor condense and the heat that is released in this case is removed into the surrounding air.
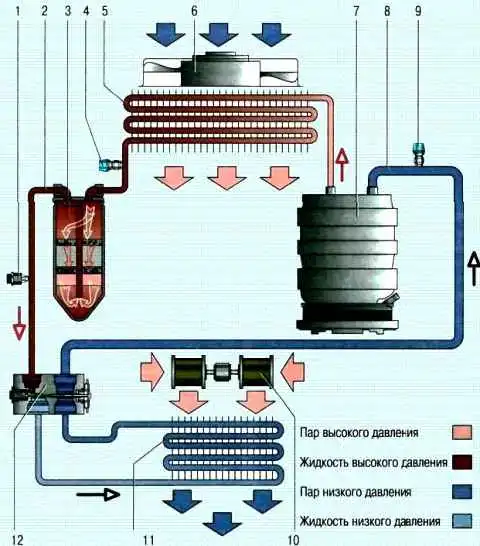
When the air conditioner is turned on, the engine control unit turns on the power supply circuit for the electric fan of the engine cooling radiator, which improves heat transfer in the condenser and reduces pressure in the air conditioner system.
At least once a year, preferably before the start of summer operation, wash the fins of the condenser cells from adhering dirt, dust and anti-icing agents.
This will improve heat transfer, reduce pressure in the system and increase the service life of the system elements.
Do not use high-pressure water jets to clean the condenser.
This can damage thin-walled fins.
Even with regular washing, the need to replace the condenser occurs much more often than we would like.
The fact is that he is the first to take on the flow of de-icing reagents, dirt and pebbles from the road.
And the walls of the tubes are thin.
In most cases, the condenser is damaged by corrosion in the third or fourth year of operation.
If the tightness of the condenser is broken as a result of corrosion, then it is more expensive to repair it.
Even if the argon welder succeeds in patching the hole, a leak may soon appear elsewhere.
By the way, the pressure in the system on hot days can reach up to 25-28 bar.
In addition, the complex structure of the condenser tube should be taken into account: along it is divided into channels by partitions, so it is likely that after welding, some of the channels will be blocked.
Accordingly, the dissipated power will drop and the operation of the air conditioner will deteriorate, especially in traffic jams and in hot weather.
After each experiment with condenser patching, you will need to pay for removal-installation, welding of the condenser and charging the system with refrigerant.
So it's better to install a new condenser right away.
Instead of an expensive original one, it is quite possible to buy a cheaper condenser from authorized spare parts manufacturers.
Removing and installing the condenser
To complete the task, you will need keys: key for 7; Torx T30; socket head for 10; pliers; screwdriver with a flat blade; container for the drained liquid.
Disconnect the negative battery terminal.
We remove the refrigerant from the air conditioning system, as indicated in the article - Removing and installing the Renault Duster heater
Removing the front bumper (article - Removing and installing Renault Duster bumpers)
Removing the radiator deflector (article - Removing and installing the radiator of the Renault Duster cooling system)

With a head of 10, unscrew the bolt securing the tube flange and disconnect the high pressure tube from the condenser.

Remove the O-ring from the tube

Unscrew the bolt with a 10 head

Disconnect the compressor tube from the condenser
Remove the O-ring from the tube

With a 7 head, unscrew the four screws securing the condenser to the radiator of the cooling system

Having lifted the condenser on the right side, we remove the condenser bracket from the holder on the radiator of the cooling system.
We also display the bracket on the left side of the capacitor

Remove the capacitor
Install the capacitor in reverse order.
Charging the air conditioning system.

")
")
")
")
")
")
")
")