


It is recommended to replace the brake fluid with the help of an assistant, having first positioned the vehicle over an inspection pit or on a service ramp.
It is recommended to replace the brake fluid once a year or in accordance with the manufacturer's maintenance schedule (typically every two years or 40,000 km) [citation:3][citation:4].
Important: Use brake fluid that meets at least the DOT-4 standard.
Never mix DOT 5 (silicone-based) with glycol-based fluids (DOT 3, 4, 5.1) [citation:1][citation:3].Required materials: new brake fluid (DOT 4), a bleeder wrench, a transparent hose, a collection container, a syringe, rags, gloves, and safety goggles (the fluid is corrosive) [citation:1][citation:4].
The sequence for replacing fluid in the brake mechanisms is as follows:
- — rear right;
- — front left;
- — rear left;
- — front right.
Bleeding the hydraulic brake system is performed to remove air that has entered the system—either during refilling after a fluid change, or following repairs to hydraulic components that involved breaking the system's seal.
Signs of air in the hydraulic system include:
- — increased pedal travel and a "spongy" or "soft" feel when pressed once;
- — a gradual decrease in pedal travel accompanied by an increase in pedal "firmness" with repeated pressing.
Important: Before bleeding the hydraulic system, the cause of the loss of seal integrity must be identified and corrected.
The procedure for bleeding the hydraulic system is the same as that for replacing the brake fluid, as described below.
The only difference is that you do not need to drain the old fluid from the reservoir beforehand; furthermore, the indication that the bleeding process for a wheel cylinder is complete is when air bubbles stop emerging from the hose—rather than the appearance of fresh brake fluid.

Unscrew the cap of the master brake cylinder reservoir.

Extract the old fluid from the reservoir and add new brake fluid up to the lower edge of the filler neck.
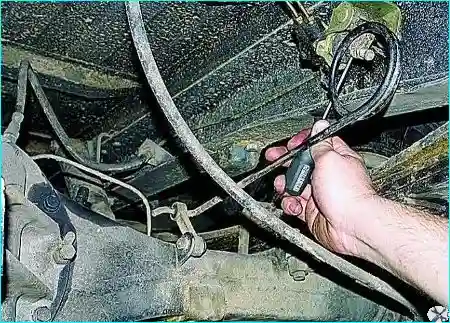
With the rear wheels suspended, we unlock the brake pressure regulator by inserting a screwdriver between the plate and the piston.
We clean the bleeder valves and remove the caps from the bleeder valves on the front brake assemblies.

We remove the caps from the rear brake assemblies.

We attach a plastic or rubber hose to the bleeder valve of the right rear wheel. Place the end of the hose into a clean, transparent bottle.
An assistant presses the brake pedal four to five times, then holds the pedal down.

Unscrew the bleeder valve by ½ to ¾ of a turn. Old brake fluid will begin to flow out through the hose. As this happens, the brake pedal should gradually sink all the way to the floor. Once the fluid stops flowing, tighten the bleeder valve.
Important: Constantly monitor the fluid level in the reservoir; do not let it drop to the MIN mark on the reservoir wall. Add fresh brake fluid as needed to prevent air from entering the hydraulic system.
In this way, the old fluid is gradually displaced by the new fluid without the hydraulic circuit ever running dry.

In the same way, we replace the brake fluid in the left front wheel brake mechanism.
Next, we replace the brake fluid in the left rear wheel brake mechanism, followed by the right front wheel brake mechanism.
We repeat these steps until the fluid in the system has been completely replaced (clean fluid, free of air bubbles, should flow out of the hose).
We remove the screwdriver (if one was inserted) from between the plate and the piston of the brake regulator.
We check the brakes. Press the brake pedal several times—the pedal travel and the force required to press it should be consistent with each press.

We add brake fluid until the level is between the MAX and MIN marks on the reservoir wall, then screw the cap back on.
We
Replace the protective caps on the air bleed valves of the brake cylinders.
After replacing the fluid, check the operation of the brake system on a safe section of the road and, if necessary, repeat the bleeding process.